Flag conservation

Flag conservation
Textile conservator, Gwen Spicer of Spicer Art Conservation at work
Showing posts with label Treatment. Show all posts

Friday, October 29, 2021

The Out-of-this-World Tale of a Bust Called "Junior"

"Junior" isn't a run-of-the-mill piece of sculpture or one you would expect to find in the special collections of a university library, yet it's part of a large collection of correspondence, manuscripts, photographs, and DVDs at the University of New Hampshire in Durham. The collection was amassed by university alumna Betty Hill and her husband Barney, a couple who claimed they were abducted by aliens. Even the dress Betty was wearing that fateful night is part of this extensive other-worldly collection.
Betty and Barney Hill lived in Portsmouth, New Hampshire. Betty (1919-2004) was a social worker with a degree from the University of New Hampshire, and Barney (1923-1969) was a postal worker. The couple were catapulted into the international spotlight when, in September 1961, they claimed to have been abducted by aliens in the White Mountains of New Hampshire. The two were returning home to Portsmouth from a trip to Montreal, Canada, when, as they were driving in the middle of the night, they saw lights approaching from the sky. What followed is said to be the first well-documented, feasibly legitimate UFO abduction in history. The couple claimed that they saw bipedal humanoid creatures in the window of a large spacecraft that landed in a field, after which they had no recollection of the next two hours. They returned home to Portsmouth unable to explain the two missing hours. Both Betty and Barney had physical evidence from the night before, including Betty’s torn and stained dress, Barney’s scraped shoe, and a broken binocular strap, but neither of them had any memory of these things having happened. [1]
Photograph of Betty and Barney Hill, Betty and Barney Hill Papers, 1961-2006, MC 197, Milne Special Collections and Archives, University of New Hampshire Library, Durham, NH, USA.

Betty and Barney engaged Ohio artist Majorie Fish to create the bust of an alien based on a description Betty provided. In fact, thirty-four letters between the Hills and Fish exist in the university's collection. Called "Junior," the bust is a popular artifact at the university, as you might imagine. It measures just 13-inches tall and is made out of an unknown synthetic material -- possibly a type of fiberglass -- that is soft enough to yield when gently pressed. Unfortunately, Betty accidentally dropped the bust at some point, resulting in several cracks in the neck and the back of the head, all radiating from a sizable loss. Scotch tape was also present in an earlier attempt to support the cracks.

"Junior," the alien, before conservation.

It was time for the university to send it to the Conservator's Studio for repair and conservation. The goal of the treatment was to repair the head and make it stable again for display.

To improve the appearance, and to remove particulate materials damaging to the fabric, the entire surface of the artifact was vacuumed with low suction and a small brush attachment.  The tape on the surface of the bust was mechanically removed.


A mount was then designed to 1) prevent the top-heavy bust from tipping over and 2) provide internal structure to lessen the possibility of the cracks becoming larger. The mount consisted of a solid redwood base to act as a counterweight. A vertical post was attached to the new base, padded with Ethafoam the diameter of the head's interior and secured to the base. The bust was placed over the padded post. When tightened, the bust was both invisibly and reversibly attached to the base. With this method, the cracks were given slight pressure to ensure they would not increase. All wooden components in the mount’s design were sealed with several coats of “Spar” Varnish, which is conservation approved.

The Rest of Betty and Barney's Amazing Story....
About a year after their abduction, Betty and Barney sought hypnosis therapy to help reveal to them the events of the two missing hours. Through many hypnosis sessions, both were able to recall what had happened and both had similar stories. Betty Hill, following her experience, became one of the most well-known voices in UFO research. The publicity she received from her abduction made her internationally famous. "Junior", the careful reconstruction of her abductor, became the most familiar face of alien visitors, inspiring internet memes and the beloved movie character, ET.  She continued her research into UFOs for the remainder of her life, even after Barney’s sudden death in 1969. The Hills, though best known for their association with UFOs and their abduction, were also active civil servants in their seacoast New Hampshire community. Both were members of the NAACP and belonged to a local Unitarian church. Barney sat on a local board of the U.S. Civil Rights Commission. [2]

Footnotes
[1] Betty and Barney Hill Papers, 1961-2006, MC 197, Milne Special Collections and Archives, University of New Hampshire Library, Durham, NH, USA.

[2] Ibid.

Resources

Betty and Barney Hill Papers, 1961-2006, MC 197, Milne Special Collections and Archives, University of New Hampshire Library, Durham, NH, USA.

Tuesday, January 28, 2020

A Family Quilt Reveals its Layers

One can say that every object tells a story. Often more than one.

In the case of a family quilt that recently arrived in the conservator's studio, it came with two distinct stories....and perhaps more.

When we think of quilts, we tend to conjure up colorful designs of pieced or appliqued fabric sewn together and layered with batting and a woven fabric backing meant to keep someone warm on a cold winter's night. For centuries, quilts were ubiquitous domestic textiles, made and used primarily for bedding, and found in many cultures around the globe. Today, quilts are often created as art pieces meant solely for display.

While quilts were often made of fabric scraps, the composition of colors and pieces, along with the sophistication of the stitching, could reveal the artistic eye and sewing prowess of the maker. As with most textiles, the materials used and their assembly also reveal the socio-economic status of the maker or owner.

The quilt's importance in the household meant they also took on prized, often commemorative, roles. They were made and given to honor births, marriages, and moves away from close-knit communities. Some traditions required that a new bride have a number of completed quilts in her dowry, thus ensuring her household could be set up quickly.

The quilt in question clearly seemed to be a commemorative piece -- at least its most recent use, that is. The top of the quilt consists of seven rows of neatly composed diamonds, each pieced with printed cottons in complementary colors of pinks, browns, and blues. At the center of each diamond was a white patch containing the autograph of a female family member written in iron gall ink. This quilt style is known as a signature or album quilt. Made in honor of the family's matriarch, its owner said the quilt dated from c1860. The date also connects with the colored prints that were popular at the time.

Front side of the Signature quilt.

In her Clues in the Needlework newsletter, quilt historian Barbara Brackman wrote, "Many of the blocks in the early album quilts made between 1840 and 1860 featured elaborate ink signatures and small drawings and verses. By the time of the Civil War, album quilt inscriptions had become shorter and were more likely to include only the block maker's name, and perhaps his or her hometown or date."

Turn the quilt over and a different story emerges. It is what appears to be a strip quilt. The back panel is made up of 13 faded and worn fabric strips of alternating toile patterns: a red/pink fabric with peacock feathers in the design and a blue and white fabric with imagery related to the Freemasons.

Reverse side of the quilt made of pieced stripes in an attractive design. Cleverly incorporating presumably left over pieces of three fabrics: a pink, dark brown and white with a blue toile print. All of the printed fabrics are quite worn, unlike the very good condition of the front side. Also visible is the patched area near the center of this side.
The Masonic images were adapted from late 18th century prints created by French-born artist P. Lambert de Linto. Masonic symbols do appear on quilts. Hilary Anderson Stelling, Director of Collections and Exhibitions at the Scottish Rite Museum and Library in Lexington, MA, tells us her hunch is that Masonic-themed textiles would have been used in homes, not lodges. Just as this reverse side suggests.

Textiles incorporating Masonic symbols, both home-made and commercially manufactured, have served many functions since the 1700s. They have transmitted family memories and history, becoming cherished heirlooms. They signified family identification with Freemasonry. Creating these objects offered an opportunity for the maker to display their skills. These textiles also functioned as educational tools - teaching family members about Masonic symbols and reminding Masons of the lessons they learned in the lodge. Like the quilts used to fundraise for political or social causes, Masonic quilts and textiles were - and still are - used to raise money for Masonic projects and charities.[1]

Below are two examples of prints by P. Lambert de Lino dating from the 1770-1790s with the corresponding similar images found in the quilt.


Also on the reverse is a large patched area near the center made of brown fabric with blue and white leaves, distinctly different from the fabric elsewhere. Obviously, this was a quilt worth saving. Did it belong originally to the family's matriarch? Did her descendants decide to honor her by keeping her quilt and adding a new top containing autographed squares? We know fabric was repurposed for quilt patterns; were whole quilts refashioned or updated, as well?


Resources

[1] "Threads of Brotherhood: Masonic Quilts and Textiles," Scottish Rite Masonic Museum and Library blog,  June 12, 2012.

Thursday, July 5, 2018

Beep, Beep! Car in the Studio!!

One never knows what one might find in the conservator's studio. Last month it happened to be a car. Yes, that's right. And as you might guess, it wasn't just any car. What rolled into Spicer Art Conservation was a 1910 Stoddard-Dayton limousine.

First, let's take a short detour into the history of this remarkable brand. The Stoddard-Dayton was a high-quality car manufactured by the Dayton (OH) Motor Car Company between 1905 and 1913. Three models were available in 1906, with the limousine being the largest and most expensive (it retailed for $3,200). Within five years, the company was offering an astounding twenty models with four different engines. Quality engineering, materials and manufacturing set this company apart from the expanding field of automobile manufacturers of the early 20th century. While most of Stoddard-Dayton models received between 15-18 coats of paint, the limousines typically featured 30 coats of paint, each coat sanded and rubbed by hand. Known for their dependability, all models were extensively road tested before delivery to the proud owner.

Is it any wonder Frank Lloyd Wright owned a 1908 Stoddard-Dayton Model K roadster?

1906 Stoddard-Dayton "Limousine of Luxury,"
from the archives of the National Automotive History Collection, Detroit Public Library

When faced with financial difficulties, Stoddard-Dayton was acquired by the United States Motor Company in 1912, and later by the Chrysler Corporation. Wikipedia notes,
Stoddard-Dayton was slow to react to the emergence of a mass market and maintained a high-quality strategy after automobiles ceased to be exclusively rich men's status symbols. They were building cars as good as possible while Ford and General Motors were building as cheap as possible.
The Stoddard-Dayton limousine that made its way to the studio is indeed special. It was built on speculation by the company and, therefore, only one of its type exists. Privately owned, it has many of the traditional elements commonly found in the carriage of a horse-drawn vehicle: leather upholstery, often tufted; brass and nickel appointments, such as light fixtures; and fabric pockets, hand loops or 'swing holders', window open pulls or 'sash holders' and slides often made of ivory or bone. The photos below illustrate how the interior design of a horse-drawn sleigh on the right is echoed thirty years later in the limousine's interior on the left. Continuing this interior design tradition makes some sense, after all, how much change can a person take?

Examples of two vehicle interiors; (left) The interior of the 1910 Stoddard-Dayton with leather tufted
 seats and squabs, wool broad-cloth covered walls and ceiling. (right) 'Booby Hut' 1880 sleigh, Long
Island Museum, (The Carriage Collection: The Museums at Stony Brook, 1986) 

Communicating with the driver was important, whether with a speaking tube or bell at the end of a cord and tassel. The the case of this limousine, a speaking tube was available. The tube was covered in wool broadcloth to match the interior's burgundy broadcloth lining fabric.

Detail of the interior door, showing all of the trim types, even with a fifty year span between examples they
followed the same tradition; (left) Stoddard-Dayton; Just present at the center top of the image is the metal
bracket for the sash holder (the lace or leather strip fastened in the bottom of the window frame used to open
and close the window) that would have fallen in front of the pocket; (right) 1860,  J. B. Brewster & amp;
Company, Circular-front coupe, at the center of the door is the sash holder with fringe.

(left) The Stoddard-Dayton's 'Swing holder' made of a wide coach lace, lined with wool broadcloth with a wooden
covered silk thread decorative element; (right) Coach lace patterns from c. 1880, the white upper center sample
is the same pattern as the Stoddard-Dayton (Ferrell, M. 1987. 'A Harmony of Parts' 19th Century American 
Carriages: Their manufacture, decoration and use).

The unusual aspect of this treatment is the amount of original textiles present that remain in good, but dirty and sooty condition. In addition, the owner was very interested in retaining as much of the original material as possible, while also wanting to be able to drive the car and accommodate passengers. It is a car, after all, that still runs.

All interior surfaces were cleaned by vacuuming and with dry soot sponges to remove residue, grime, and surface grease. Some textiles were also wet cleaned and dried. Deteriorated carpeting, window shades and tassels and the leather upholstery were all replaced as that they were too deteriorated for actual use.

Glossary

Coach laces: Narrow woven fabric used to finish edges, corners and seams. It is both ornamental and functional. They are divided into types. Broad lace – Wider woven and used in door panels, falls, handholds, and cushion sides. Woven with elaborate patterns.  (Narrower ones with abbreviated designs in coordinating colors.) Seaming lace – A narrow fabric with one selvage used to cover cords. (It is similar to piping) Pasting lace – They function as a binding on borders and edges.  Narrower then Broad lace, typically ½” wide with a tape of the same width. Binding – has one tape side; used on falls, pockets and lining.


Sash Holder: A lace or leather strip fastened in the bottom of the window frame. The loose end is finished off with a piece of fringe or other ornament. It is used to raise or lower the window. Also called a “glass frame lifter” or “glass slide


Slides: Ivory, bone or metal fixtures attached to the top edge of the door lining upon which the lace or cord moves.  It is used to lift the window in the doors; flat bolts having a notch in the end used to keep carriage windows in their places.


Squabs: A quilted or stuffed section used on sides and back panels of an enclosed or partially enclosed carriage. Also called “upper quarter panel”.

Swing Holders: Straps are used to assist the passengers with getting in and out of a vehicle as well as a sling-like armrest.

Tapes: An extended plain-weave section that is woven at either only one or both sides of the decorative lace element. It is folded under, and used as a tacking edge.

Resources


Stoddard-Dayton. Wikipedia. https://en.wikipedia.org/wiki/Stoddard-Dayton. Accessed June 30, 2018.

Stoddard-Dayton Company. http://www.owensvalleyhistory.com/stories3/stoddard_dayton_story.pdf.
Accessed June 30, 2018.

Comparison images are from publications by the Long Island Museum, formerly the Museums of Stoney Brook. Their collection of carriages is superb.

Friday, May 18, 2018

Conserving the Details From a Poet's Life


Edna St. Vincent Millay in 1914

A conservator's work often entails dealing with art and artifacts that span the spectrum from the truly spectacular to the mundane. All need to be treated with the same respect no matter their type or provenance, and the conservator's training allows her to see and understand the importance of each and every item in her care.

Passing through the conservator's studio a couple of years ago were some everyday objects belonging to one of America's most respected and successful poets. Born in 1892, Edna St. Vincent Millay grew up in a household with a strong, independent mother who took an intense interest in seeing her daughter exposed to a broad and liberal cultural education. Millay flourished in this environment, went on to graduate from Vassar College, and become a Pulitzer Prize-winning writer and feminist activist. 

Millay spent the last twenty-five years of her life with her husband at their home, called Steepletop, in Austerlitz, NY. Today the house still holds all of her furniture, her books and other possessions, many of which remain where they were on the day she died in 1950. The site is maintained by the nonprofit Edna St. Vincent Millay Society. 

Steepletop as it appears today

Enter the conservator sixty-five years after Millay's death. Three items -- a pastel portrait of Millay, a lampshade, and a Do Not Disturb hotel sign -- were all in need of treatment. 

The large portrait (30 x 25 inches) had been executed in 1937 on a dense laminated board by illustrator and portrait painter Neysa McMein for McCall's magazine. Because of Steepletop's humid environment, mold was present, as was staining, on Millay's face and the background. Extensive dirt and debris were found when the frame was opened during initial examination. The goal of the treatment was to compensate for the mold damage and reframe the picture using archival materials. The backing board and matting were removed and discarded, mold residue was removed and the staining was in-painted with a similar type of medium. Reassembly required attaching the portrait to acid-free board with Japanese paper hinges, creating a new window mat of acid-free board, cleaning the frame and adding glass with ultraviolet filtering.

Before and after treatment of Edna's portrait.

The early 20th century lampshade consisted of six paper panels containing three alternating bird prints. Not only was the shade dirty from coal soot, the metal support at its top had separated from the paper and it had been repaired with tape. It appeared that a coating, possibly to imitate thin wood veneer, had been allied to the panels. Compounding the condition were losses at the edges of the shade and a 3-inch tear with smaller tears radiating out from it. The focus of the treatment was to secure the metal support and mend the tear with Japanese paper and wheat starch paste. Creases and paper distortions were reduced through humidification.

The most curious artifact of all was the circa 1927 paper sign reading "DO NOT DISTURB / THE COPLEY-PLAZA / BOSTON, MASSACHUSETTS", which hung from the doorknob by a string. What would be an occasion that would cause someone to keep such a memento? It's interesting that Millay was in Boston along with other writers in August 1927 to protest the verdict of Sacco and Vanzetti and was arrested for her participation. Her prominence afforded her a meeting with the governor where she made the case of Sacco and Vanzetti's innocence. Could a simple hotel sign symbolize such an important event?

Before and after treatment of the sign

As often happens with ephemera, careless use or storage often get the better of it. The paper had separated into three pieces, there were tears around the string holes, and fragments of the sign had torn away. The cotton string was kinked, creased, knotted and dirty. After cleaning, the sign was reinforced with acid-free board for additional support and the tears were mended with Japanese tissue and wheat starch paste. Losses were replaced by toned Japanese tissue and in-painted as necessary. Lastly, a support stand was created for the sign.


Monday, July 17, 2017

The Conservation of Baskets

by Barbara Owens, SAC staff

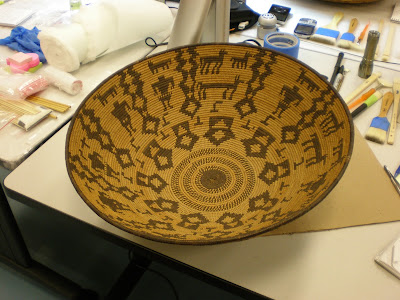
At Spicer Art Conservation we specialize in textiles, paper and objects. "Objects" is a broad category, but for us it is typically an object made of organic material that is difficult to treat, and so we are contacted for its conservation. We treat objects made of uncommon organic items, like: bone, skin, feather, hair, porcupine quill, horn, bark and a variety of species of grass, to name a few. Baskets, of course, are typically constructed of grass, but are also often embellished with additional items (feathers, glass beads, quills) making them a compound object, which could make them particularly complicated.

Spicer Art Conservation, object conservation, preservation, repair, antique baskets, Native American art, artifacts, objects.
A basket surrounded with tools to clean, conserve, and create safe storage for it.

Baskets are often not alone in a collection, instead they exist in groups, sometimes very large groups.
A few years ago, Spicer Art Conservation and other conservators had a great opportunity to clean, rehouse, and condition a very large group of baskets. The collection of over 700 baskets were owned by the United States Department of the Interior.

Conservation, repair, preservation and stabilization of antique, historic and old baskets, Native American culture, heritage, department of the interior collection.
A small sampling of some of the baskets in the US Department of
the Interior collection.

The first portion of the DOI collection was gathered in the 1930's by the first Secretary of the Interior, Mr. Harold Ickes, who then gave them to the people of the United States. It is a little known collection, but with the now improved access and storage, more research on the collection will be made. What is evident is that within the collection are great examples of all types of baskets from North America.  Read more: http://www.doi.gov/museum/upload/Interior_Shelves_newsletter_2010_issue1.pdf

Baskets have been used by humans for 1000's of years and they have many characteristics: they are vessels, sometimes with a lid. Baskets are woven, coiled, stitched, braided, knotted or put together in creative ways which make them come together in a specific shape. Baskets are purposeful or decorative, exchanged in trade or tourism. Each of these qualities are what determines the conservation of the object.

Spicer Art Conservation of objects, including Native American antique baskets with glass bead embellishments, repair and preservation of old baskets, basket collections
The before and after conservation photos of a sweetgrass basket with glass bead decoration.
LEFT: The basket's lid had fallen into the top, the handles were insecure, threads were loose and the basket was quite dirty.
RIGHT: The basket's form is more readable, it has its shape and the entire surface of the sweetgrass and glass beads
have been cleaned of the accumulated dirt.

Many baskets come to us embedded with dirt. This is not surprising as baskets are incredibly dimensional with surfaces of "nooks and crannies". Baskets can loose their shape over time, slouching or warping below their own weight. These two concerns are addressed during the conservation treatment of a basket. First the basket is vacuumed with low suction and a brush attachment to release any loose dirt on the surface both inside and out. Next the basket is cleaned with swabs and a mild enzymatic cleaner. Stabilization occurs as the basket requires it; this can be in the form of a full internal support or refastening loose embellishments or handles.

Spicer Art Conservation, cleaning or glass bead embellishments of an antique sweetgrass basket, Native American objects, textiles, beaded artifacts.
The glass beads on this basket were encrusted, both in and outside
 with dirt. Custom-made fine cotton swabs were used to gently
remove the embedded dirt from each individual bead.

Spicer Art Conservation, Preservation and Conservation of objects, including Native American baskets, antique baskets and objects
Swabbing the lip of a basket to remove dirt. The swabs are created from
cotton batting to  custom-produce the best size and shaped swab for the job.
Conservation of objects, antiques baskets, Native American baskets
Some baskets come in very small sizes, but this makes them no less complex.
 The outside surface of this basket is completely covered in tiny glass beads.
While the inside is a tightly woven, and features a simple step design.  

Read more about basket conservation and how to create storage supports in a National Park Service "Consev-o-gram": Storage Supports for Basket Collections

Read all about SAC's conservation of an enormously large basket in our previous blog: "The After Life of an Enormously Large Basket", where we discuss the store and support of a basket on a very large scale.

Basket conservation, repair and preservation of antique baskets, basket collections, old baskets, Native American baskets, large basket
The "enormously large basket"
We are happy to help you with your basket or your collection of baskets.  Examples of basket conservation can be found on our website: spicerart.com, or on our Pinterest page devoted to basket conservation.

_____________________________
Gwen Spicer is a textile conservator in private practice.  Spicer Art Conservation specializes in textile conservation, object conservation, and the conservation of works on paper.  Gwen's innovative treatment and mounting of flags and textiles is unrivaled.   To contact her, please visit her website.


Thursday, April 13, 2017

Textile mounts of unusual sizes

Cultural heritage just does not come in regular sizes.

This fact can be both frustrating and interesting, especially when it comes to the mounting and display of artifacts, particularly textiles. In our modern mechanical world our lives are filled with things in pre-determined sizes and shapes; clothing comes in systematic sizes, small, medium and large, etc. Our houses are typically built in Colonial, Cape Cod, ranch (traditional, raised or split) or other blueprint with specified characteristics. But this not so for the artifacts that tell our stories. And so, mounts and storage spaces are all dictated by the unique and often non-conforming sizes of our collections.

A recent project at SAC is such an example. It is a most unusually embroidered artifact. I am not even sure if it should be singularly characterized as a sampler, or better described as a trade-persons portfolio providing examples of their handwork. Regardless of it's original purpose, it is clearly representative of a skilled needle person. We do not know if the creator is a man or woman as the artifact is signed at one end with an initial and last name and a date of 1857.

Textile conservation of Berlin work sampler featuring Bargello needlework. Conservator Gwen Spicer of Spicer Art Conservation custom mounted the unusually sized textile sampler
Here the sampler of Berlin wool work is seen after treatment. It has been mounted and framed using archival materials. The sampler's extra long size can be appreciated, stretching 12 feet, it beautifully showcases each of the 36 unique design panels and the 35 border designs between each panel.

Similar artifacts like the one above exist is several collections, it is likely that these artifacts were produced as a demonstration piece to show skill, and therefore secure work for the embroiderer. To this endeavor, this particular artifact is reinforced and protected for travel. The entire embroidery is backed with a glazed cotton that covers the reverse side, also hiding the reverse or "business side" of the stitches. The glazed cotton backing also protects it, especially while it is rolled during transport. The outer rough edges are covered with green silk ribbon and at each corner is a small bow. The green silk ribbon also provides a nice finishing touch to any presentation.

BEFORE TREATMENT: A close-up of the end of the sampler. Here, the fraying corner can be seen, along with the silk ribbon that covers the edge and creates the corner bows. This particular panel is lovely in that it captures both the needlework as well as the beadwork. 

This artifact is also unusually sized, measuring 146 inches (or just over 12 feet long), yet it is a mere 8 inches wide. It features 36 different and unique embroidery samples. No two pattern designs are alike. And while the outer black wool floral border is consistent around the entire perimeter, each pattern sample is separated by a unique dividing border of a repetitive design stitched in (see image below). While the sample designs include those worked with both glass and metal beads, the style of the vibrant wool colors is unmistakeable, referred to as "Berlin wool work", or just simply, "Berlin work". The panels feature much more than "standard" Berlin work, it also includes a mixture of cross stitches, Blackwork insets, and several Bargello needlework panels (see image below), some panels are embellished with glass and metal steel beads. As well as a mixture of both wool and silk threads. Such an artwork! It begs the question, who was the owner? Who did they present it to? Were they successful at their trade?

One of the several Bargello panels featuring the beautiful
brightly colored wool yarns. Here, two of the dividing
border patterns can be seen as well. 

After it was done being used as a demonstration piece for earning a living, no doubt someone saw the beauty in the piece and it became decoration. Following examination, we learned that it had been mounted previously. Signs of thumb tacks and nails were present along the twelve foot long sides of the embroidery.

The prepared mount was unusual, 150" long and only 9" wide. The owner wanted to have it span the entire upper wall "frieze" area of a room with a high ceiling.  

We are often asked what goes in to creating a mount that is both constructed of materials that are archival, and preferred among conservators, as well as museum professionals to ensure that the mount materials are safe and will not harm the artifacts they hold.

The structure of the mount is multi-layered. At its base is a support which is created from an aluminum honeycomb panel which will not release harmful pollutants, is buffered against acid migration, is not prone to warping, and is light weight (which is a wonderful characteristic when you are creating a large mount that could be tremendously heavy!). Over it is a layer of soft material, typically polyester batting. Then, over that is a mounting fabric, chosen to blend best with the artifact, composed of plain weave long-fibered cotton. The textile is then carefully attached to the mount using fine thread and stitches that follow former or existing stitching so as to not create additional holes (see illustration above). At the perimeter of the mount is the fillet, which creates the space (between the mount and the UV filtering Plexiglas) for the textile to rest. The frame of the mount is constructed of aluminum and is powder coated in any color, but typically black is the color of choice. Smaller mounted items can have a decorative frame placed over the top of the aluminum frame of the mount. The mount is completed with UV filtering Plexiglas. Plexiglas is much lighter than glass and it does not shatter like glass. Depending on the mount, the hanging mechanism is often incorporated into the back (see image below).

The reverse of the mount, with hanging mechanism.

Here at Spicer Art Conservation, we mount a lot of flags and other items that all tend to be closer to being square or a "reasonable rectangle". But to have a mount with this odd proportion is not just unusual, but also fun. The studio's work tables get moved around to accommodate the extra long size and then we begin to think about methods that might be slightly out of the standard. This is all great fun; we welcome and embrace the challenging mount and unusual textiles at SAC.

Textile Conservator, Gwen spicer works to prepare
the mount for the long needlework sampler.
_____________________________
Gwen Spicer is a conservator in private practice. Spicer Art Conservation specializes in textile conservation, object conservation, and the conservation of works on paper. To contact Gwen, please visit her website or send an email.


Tuesday, February 28, 2017

How do I camouflage my magnets?

There is an increasing interest in the use of magnets, both in museums and among the general public. In many museum exhibits it is desirable to make the magnet blend with the artifact being mounted. Conservators and mount makers have used many methods of disguise to achieve this. A magnet or ferromagnetic material can be used and disguised quite easily (For more on what a magnetic system is, read our other posts: http://insidetheconservatorsstudio.blogspot.com/2013/05/ferrous-attraction-and-science-behind.html and http://insidetheconservatorsstudio.blogspot.com/2015/05/a-magnet-is-only-as-strong-as.html). 

The camouflaging method selected is often based on available supplies, expertise, and the experience of the practitioner. Other aspects depend on selecting a substrate similar to the artifact's texture, color, pattern and design. Concern for the durability and the magnet placement depends on the situation. In particular, the magnet's tolerance for being handled multiple times. Also, concern for its proximity to the visitor, especially in the case of patrons who might be susceptible to a magnet's effect (pacemaker wearers, for example).

Useful Tools:
If you must trim any material after it has been attached to the magnet, the use of metal tools like standard metal scissors can be frustrating because your tool and magnet are attracted to each other. Luckily tools made of zirconia (Zr, atomic number 40), like knives, are perfect and will not be attracted to a magnet. These knifes are very sharp and brittle, so great care is needed to prevent them from breaking.

ferromagnetic knives are not a good choice when working with magnets. Choose one of these non-metallic tools instead. Magnet mounts in art conservation with Spicer Art Conservation, Upstate New York
Useful non-metallic tools that won't be attracted to a magnet


Below is a list of various options for camouflaging a magnet:

A) PAINT
A layer of paint can be a quick camouflaging method, but it also brings challenges. One, is creation of an uneven application (it can be difficult to apply an even coat on the plated surface of a magnet). Another, is protecting the applied surface. An added protective coating is useful to aid in reducing the potential of chipping. Another option is to "rough" the surface slightly, allowing for a better grip of the paint to the magnet surface.

The painted surface on a magnet will become chipped or marred when opposing sides are quickly snapped together. This often occurs when magnets are removed and stored, or are placed near one another during preparation when ferromagnetic materials are not present. To minimize this problem, ensure that all of the magnets for one project are stored with the poles in the same direction, so that the fragile painted layers repel each other.

This might not be a choice for magnets that are used regularly. However, it can be an easy and quick method for short term needs. To do this, place them on inexpensive plumber’s tape behind silicone Mylar, scrap steel, or a metal filling-system. (see the image below).

Using a layer of adhered paper or Japanese tissue below the paint layer can improve the cohesion. For more about painting magnets go to: http://denverartmuseum.org/article/how-dam-prepared-rare-earth-magnets-installation-oceanic-textiles


storing magnets for use in conservation mounting and museum display. this quick snapping together can damage the magnet and hurt your fingers too. At Spicer Art Conservation we work extensively with magnets to create innovative treatments.
These block magnets are spaced far
enough apart to discourage them from
snapping together quickly.  

B. DIGITAL PRINT
An excellent camouflage technique is to use a digital image to duplicate the surface that the magnet covers. Larger flexible magnets are ideal for securing thin artifacts. Several conservators have published the technique, but on-line you can go to the Asian Art Museum's blog (http://www.asianart.org/exhibitions_index/batik-mounts) to read about it. 

A digital print can also be added to the outer surface of any rare-earth magnet (see photo below). 

Camouflaging is created using a long flexible magnet that
is covered with a 1:1 image of the artifact it will secure.

C. COVERING LAYER
Another approach to disguise the magnet is to apply materials that are the same, or with similar texture, as the artifact that is being supported . The materials are disguised by the color, texture or images in the local area that is being covered, or even the actual embellishment itself (see the decorative element section below). Examples of materials that have been used include Japanese paper, mat board (http://www.conservation-wiki.com/w/index.php?title=Magnet_Mounts), Nomex, fabric (http://spicerart.com/2014/12/17/hunzinger-chair-re-tufted-with-magnets), Tyvek, felt, leather, artificial rawhide, and ultra suede.

When fabric is used, using a sufficiently tight weave-structure to withstand the strength of the magnet is recommended. If the weave-structure is too loose, then the fabric weakens prematurely.  


Gwen Spicer, Textile Conservator and expert in the care of historic flags, furnishings, objects and artifacts. Art restoration and preservation services in New York, the United States, and world-wide.
Creating tufting on a chair seat using magnets. These magnets 
will be covered with the same red show-cover fabric, creating a 
camouflaging of the magnets.
D. DECORATIVE ELEMENT
Conservators have cited the magnet itself as the decorative element and hence requires placement above the artifact. The decorative element in this case aids in determining the size and strength of the magnet. If the magnet is replacing a missing element, then the size is predetermined. But the grade can be adjusted to better match the magnetic system.

When a magnet is securing the element to the artifact the magnet needs to have the strength for support. The element can be a range of sizes and shapes, large; and flat or small footprint and tall. A magnet must be selected that will secure the element, while also not damaging the artifact below. 

Read more about disguising magnets as decorative elements at the Asian Art Museums website: http://www.asianart.org/collections/magnet-mounts 


Decorative element secured to a costume using a magnet.
E. Embedding
A successful method of placing rare earth magnets within materials is embedding them properly. Keeping the magnets surrounded by materials aids in their longevity, by lessening the risk of demagnetization from both shock and heat. These embedded magnets or ferromagnetic materials can be placed on top or within an artifact, as well as used as a point fastener, or as continuous pressure on the artifact. 

Any three-dimensional artifact can be easily mounted and supported. The magnet or ferromagnetic material can be embedded and hidden inside. In addition, many of these systems can be reused. The wide selection of materials used are Ethafoam, pillows with batting and a baseboard, materials that are easily carved, and rigid or simple acid-free board.  Read more about creating mounts here:

Magnetic exhibit and display is possible with a variety of applications of a magnetic system. Here, the magnetic system is used within the artifact. The application is fully reversible, will not harm the artifact, and is reusable.
Ferromagnetic material attached 
to an acid-free board inserted 
into the base of a wooden box.

Magnetic systems for mounting and conserving artifacts can be complicated, but with some knowledge, any conservator or mount maker can create a great magnetic system.

The shape of the magnet, whether using a disc or a block, does not affect many of the methods described above. The only exception is cutting a hole into mat board. Here having a block-shaped magnet could be simpler than cutting a round hole, but a drill bit can be used.


At Spicer Art Conservation we are always interested to hear of magnet use success stories. In fact, Gwen Spicer, owner and principal conservator of SAC is busy writing a book about the use of magnets in conservation. The book features examples of successful magnet use by conservators. If you have a story or project you are particularly proud of, and would like to possibly be included with other successful magnet using conservators in the book, please share your own experience of covering and camouflaging magnets. We want to hear!

___________________________
Gwen Spicer is a conservator in private practice. Spicer Art Conservation specializes in the conservation of textiles, objects, and works of art on paper. Ms. Spicer is known for her innovative treatments and mounts using magnets. 


Learn more about magnets and their many uses in the new publications Magnetic Mounting Systems for Museums and Cultural Institutions. Available for purchase at www.spicerart.com/magnetbook.

To contact Gwen, visit her website: www.spicerart.com or send her an email: gwen@spicerart.com.