by Gwen Spicer
I LOVE MAGNETS! There, I said it. Magnets are perhaps the most amazing and versatile tool in a conservator's toolbox. The more I work with them, the more I am amazed at their possible uses for mount-making, display, transportation, treatment, etcetera. I am sure my love of magnets was solidified a few years ago while working on the exhibit, "Uncommon Threads", at the Maine State Museum in 2006. A group of us came up with a mounting system to secure artifacts by using rare earth magnets and "attach" them to moveable mounts that were not able to accommodate sewing. This group of individuals included Linda Carroll, Ron Harvey, Judy Mayer, Toosie Scharoun, Dona Smith, and myself. And while this was not a new idea, it was used exclusively throughout the exhibition, which might have been a first.
The exhibit was to travel. So the concept proposed by the conservators and curators was for each artifact, or group, to be mounted to a panel that could be lifted from the travel box, placed in a display case, and then put back in the travel box. In this way, the artifacts themselves would not be touched, just the panels, therefore lowering the handling and potential damage of the artifacts.
Each mount was supported with a layer of DiBond, on top of which were two layers of 1/4" thick Volara. For artifacts that required an additional recess, 1" thick Ethafoam was placed below the Volara layer. The mount size was determined by the grouping of artifacts as some would be alone, and others would be in a small grouping. Once positioned, the upper 1/4" layer of Volara was removed in the outline of the base of artifact. (see photo below).
 |
| Cutting out the recesses of the upper layer of Volara. |
 |
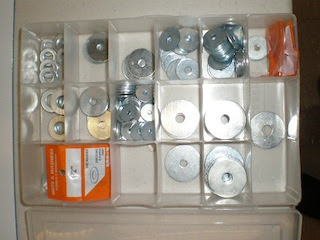
| Washers of various sizes to accommodate various sized magnets |
 |
| various sized magnets, separated with containers or bumpers |
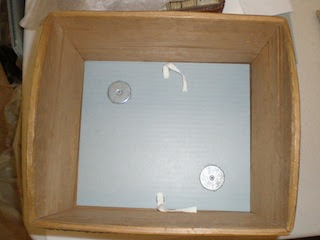
To create the mount, a paper template of the artifact's interior was made first and then transferred to a blue board. The desired locations of the washers were cut into the top layers, leaving the lower most paper layer intact. Hot melt was used to secure the washer in place, then twill tape ties were created for ease of removal of the boards.
 |
| Internal support with fender washers |
The magnets were secured to the mount panels. A hole was cut out for the magnet and hot
melted in place* (please see note about hot melt below). Mylar was used as a separator for positioning.
The edges of the foam were cut slightly larger than needed, they were then adhered together, and lastly a scalpel was used against the DiBond to make the final trim.
A 1” wide Beva strip is applied to the back side of the panels. A strip of ¼”, double-sided, tape is also applied to the inside edge of the Beva strip to give initial hold to the fabric, as well as room for adjustment before the final securing with the Beva.
 |
| The cut out recesses for the each band box before the display fabric was attached. The magnets are fitted into the lower layer. |
 |
| The finished mount with the band boxes in position. |
For moccasins, a blue board was fitted with a fender washer: one for heel, one for toe. The bottom of the heel muslin support was filled with resin-free polyester fill. The viewing side of the muslin was machine-stitched in a U-shape. The toe was supported with a separate pillow of folded muslin and fill.
 |
| The construction of the internal moccasin supports with lower supports for the washers. |
For the silver gorgets (see image below), the internal shape was created with layers of needle-punch batting. Each layer tapered out from the next. A Magnet/washer was positioned at the center and was fabric covered and secured to the reverse with double-sided tape and hot melt glue*. The Gorget was secured to the mount with Skala thread.
 |
| Preparing mounts for the Gorgets with domed batting layers |
*An important point needs to be made about hot melt. Rare Earth Magnets have a "Curie Temperature" which means that exposure to heat at (or above) a certain temperature will demagnetize the magnet, therefore rendering it completely "powerless". In our testing, hot melt, when placed directly on these magnets, did in fact demagnetize them. So, to circumvent this, we would place the hot glue on the surface the magnet would be adhered to, wait for it to cool to a temperature where we could put our finger to it, and then place the magnet on it. This worked great, the temperature posed no danger to the magnet and the strength of the bond was not compromised.
Another important point to make about this type of mount is that the magnets were meant to hold the objects in a horizontal position. Therefore, this is very different from using magnets in a vertical mount. Supporting the weight of an object poses very different demands from the magnets where its full pull force is needed. To support the weight of an object one must evaluate the size and strength of the magnet, the object to be supported, and the angle at which it would be displayed, to name a few.
Since my time in Maine, I've successfully used magnets in several other projects and I've learned enough about magnets to fill a book! If you are a conservator who is not using magnets, you should.
And once you start, I bet you'll love magnets as much as I do...well maybe as much.
The AIC Annual meeting in Indianapolis, IN was a great time to learn more, at the hands-on session: "Ferrous Attraction: The science behind the magic" permanent magnets were discussed and rare earth magnets were tested in small groups.
_____________________________
Gwen Spicer is a textile conservator in private practice. Spicer Art Conservation specializes in textile conservation, object conservation, and the conservation of works on paper. Gwen's innovative treatment and mounting of flags and textiles is unrivaled. To contact her, please visit her website.
Look for Gwen's book, "Magnetic Mounting for Art Conservators and Museums", available in 2018.


