Flag conservation

Flag conservation
Textile conservator, Gwen Spicer of Spicer Art Conservation at work

Friday, November 28, 2014

Conserving, then mounting a pair of Leather Gloves with magnets

It has been a while since we at SAC have blogged about magnets. But that is not because magnets have not been on our mind! In fact, we have been quite busy working with them. So we thought that we would share a magnetic mount that we have recently designed. And with it, discuss the idea of using a Universal Standard Language to discuss magnetic mounts, so that they can be understood and replicated by other conservators and mount makers.

The pair of gloves to be mounted had been worn to Abraham Lincoln's funeral on April 19, 1865 in Washington, DC by Robert Van Valkenburgh, a United States Congressman from New York and a Union Army officer.


The gloves are Paris made, as indicated from a stamp that appears inside one glove. They have been owned by the New York State Military Museum for many years and had been in a museum display in the early half of last century. For their upcoming exhibition, the New York State Millitary Museum wanted them again to be included in a short-term display. These 150+ year old gloves are made of fine thin leather, and both gloves together are quite light in weight.

After some humidification, a mount was created where one glove was palm down and the other was palm up. The gloves were quite stiff and misshaped from being wrapped and stored flat. Holes were present from a previous mounting method. The once black color of the outside of the leather had begun to powder and flake, mainly along the fold lines. Due to their fragility, a mount using magnets was created.

Once the shape of the gloves were determined, an internal form using Nomex was created for the fingers and palm for each glove. The thumb was supported separately. Attached to the Nomex were stitched two "L" brackets. They were positioned to support two of the fingers (image below).

magnetic display mount for museum, Lincoln assassination, art conservation, historic garment
The "L" brackets were selected to also support the fingers, as well as the palm of the glove

magnetic mount of artifact for museum display, art conservation, Lincoln assassination, rare earth magnets
Nomex layer with the attached steel brackets, also covered with foiled-paper tape.

The brackets were both stitched with button hole thread (top photo above) and covered with foiled paper tape (directly above). The edges of the brackets were outlined with Volara framing tape in order to cushion the hard edges of the steel bracket. This was to be the side that faced the mount. The visible side of either glove was carefully padded out with layers of 1/4" Volara foam.

Rare earth magnets used to mount artifacts in art conservation and museum display. New York State Millitary Museum
Internal support and the Glove

Much can be discussed about the nuances of the internal support and the creation of the mount. Both of which are also important, but for this blog, it is the magnet system that we are focusing on.

Block shaped, 1/2"x3/8"x1/8", N42 Neodynimium rare earth magnets were used and secured to the mount. I have begun to think that magnets should be secured to the mount rather than incorporated with the artifact.  For one, the mount can be reused, and having the magnet positioned in place could potentially be useful. Where as if installed in the artifact's internal structure, the magnet might stay there. With the cost of rare earth magnets increasing, and also with the unknown long-term effects, magnets kept within artifacts might be ill advised. Also, keeping an "active device" such as a magnet inside the artifact may cause inadvertent harm. What I mean is that we at SAC often speak of the "one-mindedness" of magnets. Magnets are always "on", and they will jump to a receiving metal as quickly as possible. If you did not know that an artifact had a magnet inside of it you could place it on or near something you actually do not want it to magnetically attach to.

Magnetic mount created for display of artifact from New York State Millitary Museum. Art Conservation
Magnets glued to the Plexiglas and covered with foiled-paper tape.
Positioned magnets with the Volara layer. Thin Volara
was added over the magnets to fill the recess. 

Gwen Spicer is the preeminent art conservator when it comes to treatments or creating museum mounts using rare earth magnets
Before the show fabric has been placed on the volara, but here is how the gloves will be positioned when they are displayed.

In each of the papers I have published, or any of the presentations I have given, I talk about magnetic systems as being a three part system; 1) the strength of the magnet, 2) the ferromagnetic material and 3) the gap. As a means to begin to clearly illustrate my system to others, a form of language to describe the system is necessary. How do we begin to think about and write the three parts of a system? Below is my attempt to begin a discussion. The mount description is in brackets and begins with the bottom most layer first. The artifact is listed in italics and the internal structure within the artifact follows within the braces (aka squiggly brackets).

1. The position of the magnet is indicated by an asterisk. The grade and size of the magnet is in parentheses and follows the asterisk: *(grade, shape, size)
2. The ferromagnetic material, is underlined, it's gauge and/or thickness follows in parentheses.
3. The gap layers are in bold.

[Plexiglas, *(N42, block-1/2"x3/8"x1/8"), foil paper tape, Volara tape, show cover fabric] artifact (thin calf leather), {foil paper tape, steel bracket (1/16" thickness), Nomex}

Is this word diagram of mount layers (illustrated below) sufficiently explained so that another conservator or preparator can recreate this magnetic mount? What part of it is not understandable? How does this need to be changed?

cross section of Gwen Spicer's rare earth magnet mount for the display of an artifact at the New York Millitary Museum
Cross section of magnetic mount for gloves.
_____________________________
Gwen Spicer is a textile conservator in private practice.  Spicer Art Conservation specializes in textile conservation, object conservation, and the conservation of works on paper.  Gwen's innovative treatment and mounting of flags and textiles is unrivaled.   Her current research focuses on the use of rare earth magnets in conservation treatments.  To contact her, please visit her website.

Learn more about magnets and their many uses in the new publications Magnetic Mounting Systems for Museums and Cultural Institutions. Available for purchase at www.spicerart.com/magnetbook.

Thursday, November 20, 2014

Dust Covers. So many designs, so many choices


Dust covers are critical in protecting collections from light and dust. They are an easily implemented level of protection. Recently SAC created a Tyvek dust cover for Historic Cherry Hill, as a costume hanging unit. The hanging unit to be covered is a chrome-plated Metro International system on large caster wheels. Historic Cherry Hill was fortunate to receive an IMLS grant for the equipment and supplies.

There are many ways to construct a dust cover, thus no set method or set materials are specified for use. In my experience, it is more based on the dimensions of the materials available for the project, and the time and skills to devote to the project, that determines the design (simple low tech vs. complex high tech). Think about those great dust covers at FASNY Firefighting Museum that used magnets to support the Tyvek! FASNY needed covers but did not have the staff time to create complex covers, their low tech solution is fabulous.

Along my travels through the years I have seen covers made of muslin or other types of cotton fabric, even pull-down curtains used for barriers, which is just another case of where solutions for preservation are about available materials and creative minds.

But, back to Cherry Hill's cover.  The construction of the cover was created by the fact that from the base of the unit to its highest point was about the same measurement as the width of the Tyvek. Therefore a full sheet of Tyvek wrapped the sides of the unit and a separate piece was positioned at the top. This required little sewing, just around the upper edge.

The front has a center front opening that is secured with twill tape ties, as seen in the image below. Ties are postioned at the top, and then in several locations down the front opening.

Custom made tyvek dust cover, created and designed by Gwen Spicer of Spicer Art Conservation, New York
The cover placed onto the unit with the front closed.

For this particular cover we added a means to pull back the two panels ("curtains") of the front, to allow for complete and unobstructed access. The center front opening allowed for this to happen. The method we used was to add along the upper edge, a horizontal cord that ran from one far side to the other. Small plastic rings were evenly positioned along the upper edge of the two front opening sides and stitched along the opening. The rings were previously threaded onto the cord, thus acting like a curtain rod.

Custom made tyvek dust cover for the archival storage of historic clothing. Designed and created by Gwen Spicer of Spicer Art Conservation
The cover untied, with the front panels opened.

The cord was secured at each end and at the center. The cord was held taught because the cover fit so well to the unit.

Detail of the front corner with the front pulled open.

Custom made Tyvek dust cover, archival museum storage, Spicer Art Conservation
Reverse side of the dust cover.
If you are wondering how big this cover is, it is very big.  And yes, working with a cover this size is a bit daunting.  We are talking about yards and yards of Tyvek.  This is one reason why the cover was designed to minimize the amount of stitching. Tyvek is inherently stiff and therefore difficult to negotiate with the sewing machine. But we pulled it off, and even made ruffled edges around the giant caster wheels.  A nice touch if we do say so.

We at SAC are happy to have had the opportunity to design and construct this custom dust cover to protect the collections for Historic Cherry Hill.

_____________________________
Gwen Spicer is a textile conservator in private practice.  Spicer Art Conservation specializes in textile conservation, object conservation, and the conservation of works on paper.  Gwen's innovative treatment and mounting of flags and textiles is unrivaled.   To contact her, please visit her website.

Look for Gwen's book, "Magnetic Mounting for Art Conservators and Museums",  available in 2018.

Wednesday, November 12, 2014

Not on THAT hanger! Proper storage of hanging collections

Here at SAC, textiles are our "thing". When pressed to label SAC's specialty in conservation, textiles more than likely come in first, (but gosh we do an awful lot of paper, objects and upholstery!).

Whether it is a silk dress from 1840, or a military jacket from the Civil War, or perhaps a christening gown passed down through generations, historic costume is is an important part of any textile conservator's work. Too often, garments are brought to us in a condition that could have been prevented. The damaging item is sometimes a surprise, as not everyone knows the dangers of acid migration and that the natural organic wooden hanger supporting the prized garment is the thing that is doing the most harm. Wooden hangers, while very sturdy, are made of wood which is quite an unfriendly companion to textiles (as evidenced below). (See Glossary of safe materials for storage).

textile conservation, proper storage, archival materials, damage to artifacts, improper handling or storage
The light color of this jacket lining allows the staining from the hanger to be quite visible

But let us not point an accusing finger to wooden hangers only. It is not just the material a hanger is made of, it can simply be the hanger itself. Perhaps the item is too fragile to hang, or the hanger is far too big for the tiny garment and the arms have been forced out to the side rather than to hang naturally from the shoulders, or perhaps the heaviness of the garment causes undo stress to the fabric at the shoulders, resulting in weekend areas now prone to tears. Another contributing factor is the thickness of the hanger, a thin wire hanger is not as supportive as a thick molded polystyrene hanger, simply because the thicker hangers ease the distribution of weight across a larger area, while the wire creates specific and unforgiving stress points.

Textile Conservator, Gwen Spicer created these hangers to support historic garments.
A few examples of hangers that have been padded in various ways to accommodate specific garment and needs. Notice the hangers at the lower right corner are quite small, perfect for children's garments. The hangers at the top demonstrate covers that support a great deal of the upper portion of a garment, and how you can even add "arms".
When treating textiles that are destined for hanging storage or display, we always enclose an information sheet about creating padded hangers, and many times our treatment includes creating a custom made padded hanger for the garment.

Creating padded hangers might seem like a daunting task, especially to the curator of the historical society with walls lined with racks holding innumerable garments, all hanging from wood, plastic, or those lovely but quite thin wire hangers (a la dry cleaner). I know, you are thinking about dry cleaning bags now too, you are thinking how you've seen them covering antique garments and you know it's wrong…we will talk about this later.

To get started, evaluate the garment you would like to hang, determine the proper type of padded hanger design, and gather your materials. Since the initial idea of a padded hanger back in the 1970s, hangers have come a long way. Conservators and collection managers now have far more options to the original design than ever before. But in all cases, they follow the same simple rules.

RULE #1:  A textile should NOT be hung if it is fragile, or if the hanger causes strain on the garment. These more delicate textiles must be boxed and padded out to prevent crushing from folds. Read more about boxed storage of textiles in our blog post about proper storage and support of textiles .

Good intentions. This hanger is at least covered, but just behind it can be seen the
uncovered wooden hangers. Notice the strain on the shoulder lace. This hanger is
also too wide for this particular garment.
RULE #2: The hanger should not be wider than the shoulders of the garment, i.e. you would not hang a small child's dress on a 17 inch hanger. When the hanger (even if padded) extends into the arms of a garment it creates undo stress and misshape of the garment.

Alternative storage for artifacts, museum storage, art conservator survey of storage space
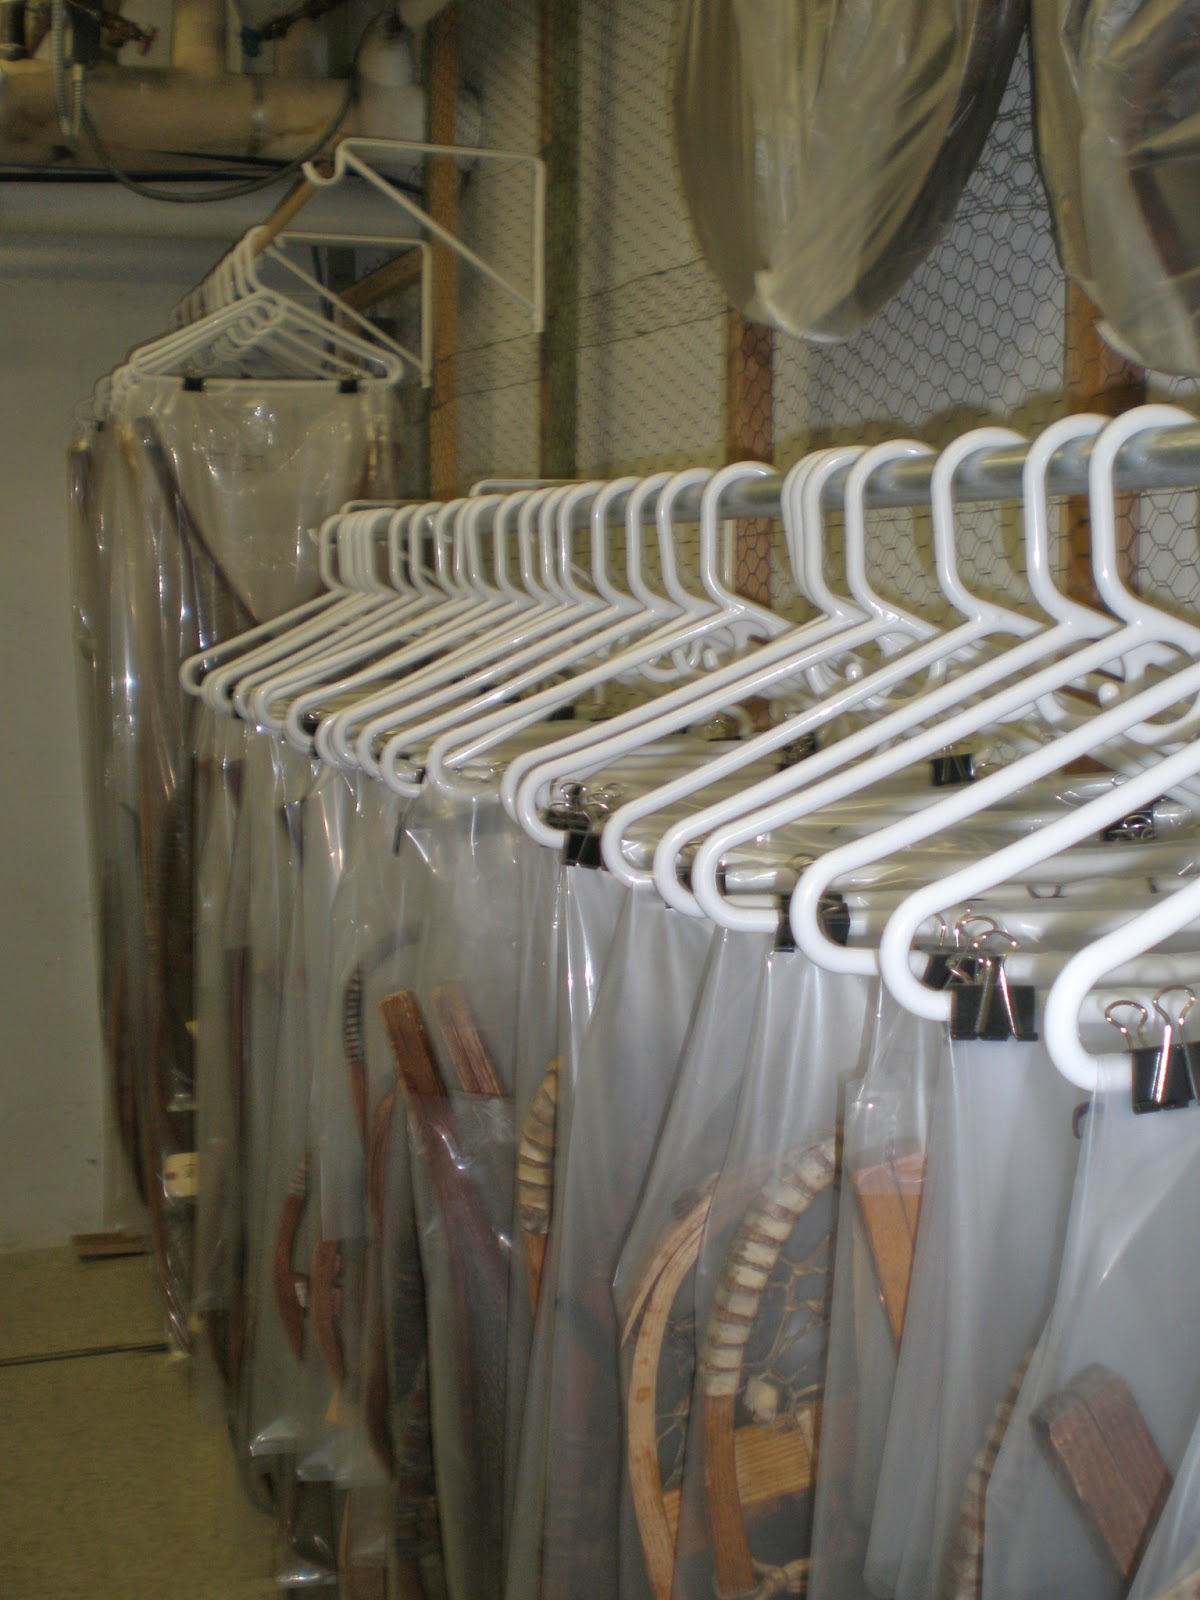
Hangers can be modified to hold objects as well. Here various items, including snow-shoes
 are hung from hangers and enclosed in an archival bag. In this way any applied stress is even
and visual access is possible. An inexpensive solution at its best!

RULE #3: Selecting supplies and materials is critical to constructing your padded hanger. All materials need to be archival: inert, neutral pH, and will not off-gas.

RULE #4: Never hang knits. Just don't. They will stretch and sag and then the damage is irreversible, so just avoid it all together.

proper storage of historic garments in a dedicated archival space. The garments are placed on padded hangers for support
Suit jackets hanging inside of a storage cabinet. Each of these jackets are in
excellent condition and are able to support their own weight. The hangers are
widely padded to mimic a shoulder. Sufficient space for each suit is also provided.

How heavy is the garment you are hanging? Robes, coats, capes and heavily adorned costumes are particularly heavy. Evaluate these appropriately with consideration to the strain on the shoulders to hold all that weight.

There are some other advantages to padded hangers. The material that covers the hanger provides a gripping surface so the garment can "hang on" and not shift much once it is placed on the hanger.

proper storage, padded hangers, museum archives, art conservation
A row of padded hangers in a storage cabinet.
Hangers not only come in different sizes, there are other shapes as well. The Pants hanger, or the strait style hanger with clips is another frequently used item that needs re-evaluation. The clips are just too harsh, they cause crushing, severe pressure points, and usually sagging of the garment in between the clips. The alternative here is the hanger that works more like a strait clamp. These types of hangers can also be padded and provide support that is evenly distributed, this is a much more gentle approach. But keep in mind the length of the hanger and the what it is supporting.  If the waist of a skirt extends well past the clamp edges, it is too large for this type of hanger and is not being properly supported.

The wonderful thing about padded hangers is that they don't have to be expensive. In fact, I am reminded of the Canadian War Museum's ambitious project back in 1999, when they had a backlog of 15,300 (!) clothing items. They needed a quick, archival acceptable, but inexpensive solution and came up with what they dubbed "insta-hangers". Using 1" pipe insulation made from closed cell polyethylene, they covered hangers and got to work.  Ingenious!

Need some illustrated instructions to create your own padded hangers? Lots can be found on-line. Here is a link to Minnesota Historical Society's instructions for making a padded hanger: http://www.mnhs.org/preserve/conservation/reports/paddedhanger.pdf
Also, a step-by step method for creating padded hangers as well as cotton muslin coverings from blogger, Sara who works as a curator: 
And last, but not least, the NPS Conserve O Gram from 1994:

In our next blog we will discuss dust covers and how they keep unwanted things (i.e. dust, debris, cat hair, etc…) off of your textiles.

_____________________________
Gwen Spicer is a textile conservator in private practice.  Spicer Art Conservation specializes in textile conservation, object conservation, and the conservation of works on paper.  Gwen's innovative treatment and mounting of flags and textiles is unrivaled.   To contact her, please visit her website.

Friday, October 31, 2014

Textile Conservation of First Lady Angelica Van Buren's dresses

By Barbara Owens, SAC staff

There is so little known about this intriguing First Lady. We discussed at length the mystery of Angelica Van Buren's wedding gown in our post on August 1, 2012. The dress, which is the subject of that post, is said to be her wedding gown. If you want to read about the connection (or lack of) between that dress and the dress she wears in her official white House portrait, visit our blog post here.

Textile conservator Gwen Spicer built custom padding for the long-term storage of this historic garment
This stunning bodice is truly eye-popping. The color is still
amazingly vibrant, this dress must have been a show-stopper.

In that post, the information we discovered about Angelica portrayed her as a warm gentle spirit who wholeheartedly accepted her role as First Lady, despite her young age and despite the fact that she did not have to take on this responsibility. At 21 years old, she agrees to serve as first lady at the request of her widowed father-in-law, President Martin Van Buren.

Angelica is young and beautiful. She brings a fresh look to the White House, and although she will be fiercely criticized by Van Buren's foes as being aristocratic-like, she is nonetheless the daughter of a hugely successful southern plantation owner. She is wealthy in her own right and has a clear style befitting a woman of her upbringing and social status.

This style became very clear to us at SAC when we were asked to re-house several dress sets belonging to Angelica. Each of the components of these dresses were beautifully made, the colors (especially the purple dress) were wonderful. And even though they have faded in the 170 or so years since she wore them, you could easily imagine Angelica making her official entrance as hostess of a White House dinner, with all heads turning to see this fashionable young lady.

Art conservation, historic garments, textile, storage support, museum storage, Van Buren
The matching bodice to the bodice pictured above and skirt of the exact pattern/color. Here you can more
clearly see the white dots in the fabric, these are not as prominently visible in the other purple pieces.
Here you can also see the shattered silk under the armpits.

The components of the dress sets are in fair to poor condition, with the most compromised parts being the parts soiled from perspiration. In these areas the silk was shattering and much of the fabric here was vulnerable to loss.

The dress sets are referred to as such because each consists of pieces that would be put together as a set to make a dress. Each of the components we treated clearly went with another piece. The purple skirt matched the purple bodices and the black bodice, the pink silk skirt matches the the pink silk bodices, and could easily be paired with the black velvet bodice. The only bodice that does not seem to have perfect match is the purple bodice with the ribbons at the sleeve. Its matching skirt may no longer exist.  Also, it seems to be of a different era than the other dress components, perhaps that is why it just does  not "go" with them. But interestingly, it bears a very strong resemblance to the wedding dress (pictured below).

Textile conservation, museum storage, art conservator, Gwen Spicer, Spicer Art Conservation, Angelica Van Buren

Textile conservation, museum storage of historic garments, art conservator, Van Buren
This particular bodice did not have a skirt which accompanied it. However, it seemed to "go" with the
 black velvet bodice pictured below. The "pink" bows at the sleeve had a matching bow that had been
detached from any of the pieces.  Perhaps it was meant to be placed at the front of this bodices.

The dresses were only to be re-housed for storage. Each dress component received a padded support to reduce the folds and therefore crushing of the dress. The dress sets were placed into acid free boxes with slings to reduce handling while examining or moving the dress components from their storage boxes.

The dresses in this "set" were labeled as such because many had interchangeable parts. The pink bodice with poof sleeves (below) is the same fabric/color as the bodice to the left. Each could be worn with the pink skirt, in the same color/fabric.

Spicer Art Conservation, Van Buren dresses, textile conservator, historic garments, 1840s
Here three of the bodices are grouped to be stored together.  
Previous repairs in art conservation, textile conservation, damage to silk, 1830's dress
An up-close photo of the sleeve of the purple bodice. Here you can clearly see previous
repairs,the staining from perspiration, and most importantly the detail of the fabric.

The exact date that these dresses were made or worn is not known for sure. Angelica serves as First Lady from 1839 to 1841 and then spends several years at the Van Buren estate in Kinderhook, New York, which is the location of the National Historic Site. When one looks at the style of the dresses and compares them to standard fashion "plates" of the 1830's they are clearly lacking the "leg-of-mutton" sleeve of the early 1830's, but certainly take on the late 1830's look as indicated below.
This is a wonderful image from the Museum of Costume. Notice the model with her back to us shows
that infamous "leg-of-mutton" sleeve, while the model who faces us shows a gown silhouette that
could easily be in keeping with the dress components from the Van Buren NHS.

The 1840's fashion standards may be more clearly met with these dresses. As Susan Jarrett writes on the history of Fashion and Dress section of the website www.maggiemayfashions.com: "By the mid 1840s, the shape of the skirt took on a bell shape and stiff crinolines along with multiple layers of petticoats became necessary to aid in lifting the circumference of the skirt. Double flounced skirts became quite popular. Bodices of the late Romantic period typically had basque waists (or elongated waistlines which ended in a point at the front). Necklines were round, V-shaped, and wide for both day and evening wear." This description seems to best fit the dress sets above. But below is an 1855 painting by Franz Xaver Winterhalter with some similar necklines to what we see in the wedding dress or purple bodice with bows. Hmmm…the mystery continues.


Keep in mind that Angelica's dresses are at about 170 years old. They were clearly cared for, and are a glimpse into a relatively unknown life of the 8th First Lady of the United States. While the dresses will need to undergo full conservation treatment in the future, they are now being housed and stored in a way which will not hasten that treatment. Their padded supports and archival storage materials will allow for their safe keeping. 
_____________________________
Gwen Spicer is a textile conservator in private practice.  Spicer Art Conservation specializes in textile conservation, object conservation, and the conservation of works on paper.  Gwen's innovative treatment and mounting of flags and textiles is unrivaled.   To contact her, please visit her website.

Thursday, October 23, 2014

Mothballs, yuck.

by Gwen Spicer

Over the years I have seen mothballs in many collecting institutions and client homes. They are a true "left-over" from a time in the twentieth century where chemicals were thought to solve all of our problems. While mothballs and other chemicals gave the appearance of solving some problems, what they really did was produce a great deal more!

Mothballs.  No one should use them, EVER.

Our awareness of the hazards of chemicals is still quite new. We all have Rachael Carson to thank for her timely publication "Silent Spring" in 1962. It woke us all up to the danger and harm that we were doing to our environment and ourselves. Sadly, it may have not been widely read. 52 years later we continue to use harmful products thinking we are somehow helping.

Rachel Carson, truly a voice ahead of her time.


After Carson's book, laws were quickly enacted that stopped or limited the use of the most harmful chemicals and pesticides, especially the use of DDT. However, many others still remain on the market. Mothballs are one of these. The little white balls of toxin have been used for decades to deter and kill moths and other insects from damaging wool textiles.


The definition of a mothball is as follows:


Small balls of chemical pesticide and deodorant used when storing clothing and other articles susceptible to damage from mold or moth larvae. They come in two different formulations; one, using naphthalene, and the other using paradichlorobenzene as the active ingredient. Naphthalene, a hydrocarbon derived from coal tar, which easily exudes gas, acts as a fumigant.

So why are mothballs hazardous to your health? Several reasons:
 Naphthalene fumes may overwhelm a child wearing a sweater recently removed from a chest containing mothballs. Inhaling the chemical can lead to nausea, vomiting, fatigue, headache, fever, confusion, and fainting. Routine exposure can cause a condition called hemolytic anemia, where a person's red blood cells get damaged. Ingestion or skin exposure causes more extreme reactions in the liver and bladder, causing jaundice, lightheadedness, and eventually leading to coma. Not surprising, but cigarette smoke contains the chemical, which as we know can lead to cancer. So really, there are no health benefits associated with naphthalene.

Toxic nature and damage from use:
Older mothballs consisted primarily of naphthalene, but due to naphthalene's flammability, many modern mothball formulations instead use 1,4-dichlorobenzene, which may be somewhat less flammable. The latter chemical is also variously labeled as para-dichlorobenzene, p-dichlorobenzene, pDCB, or PDB, making it harder to identify unless the purchaser knows these synonyms. Both of these mothball chemicals have the strong, pungent, sickly-sweet odor often associated with mothballs.

Both naphthalene and 1,4-dichlorobenzene are the main ingredient in mothballs because they undergo sublimation, which means that they start in a solid state which evaporates directly into a gas; this particular gas is toxic to moths and moth larvae, hence it is an effective pesticide.

Another version of a mothball, and just as dangerous, is moth crystals. They are made exclusively from paradichlorobenzene (PDB), which is considered even more toxic than naphthalene. Regardless of their toxicity, both chemicals are a poor choice for storage because prolonged exposure of PDB vapors on plastics may melt them, affecting some sweater boxes and other types of plastic; it is therefore not recommended to use on clothes with plastic buttons or decorations. The effects of PDB on humans are not well known, but it is a suspected human carcinogen because it has been shown to cause cancer in animals.

An all-too-common sight.  Mothballs and the clothes they
are "protecting" sealed tightly in a plastic container

For the insecticidal chemicals of mothballs to be effective, they need to be placed with the clothing in a sealed container so the vapors can build up and kill the moths. In a sealed atmosphere like this, the vapors are not as harmful to people because they are relatively contained. The main exposures would occur when filling or opening the containers, or from wearing clothes immediately after opening (especially a problem for infants).

Naphthalene mothballs and 1,4-dichlorobenzene mothballs should not be mixed, as they react chemically to produce a liquid (rather than sublimating) that may cause damage to items being preserved. Should this happen to your artifact, the outlook is grim. :(

If that is not bad enough, there are things that make mothballs even worse. Wet mothballs are even more potent than dry ones. And the wetness can be profound, like exposure to water from a flood or leaky pipe, or mild, in the form of high humidity. Either will cause the odor to be more potent and sublimation to be more rapid. This increase in potency puts the person treating or washing the garment at more risk. Similarly, sometimes the garment has not been in moth balls for a long time, but upon wetting for treatment, the chemicals that had been absorbed inside the fibers and had sat dormant, are released. Textiles are not the only at-risk items for chemical absorption. Wooden cabinets, shelves, or drawers also have the propensity to absorb the harmful chemicals.

In addition to repelling or killing insects such as moths and silverfish, mothballs have been suggested for use as a stovepipe cleaner, a snake repellent, and to keep away mice or other pests. This of course is a terrible suggestion. A quick information search will show you that placing mothballs in the attic, or other areas of your home only results in the family dwelling there to become horribly ill.

Another major concern about the use of mothballs as an animal repellent or poison is their easy access to children, pets, and beneficial animals. Leaving them in a garden or in a living space unprotected makes it very easy for unintended victims to gain access to them. Mothballs are highly toxic when ingested (they have a sweet odor and taste, making this more likely), and will cause serious illness or death.


Now that you have read the above information and never want to use mothballs again, let us talk about the alternatives and why so many people prefer to use safer, more natural remedies to rid themselves of those pesky moth larvae that can eat holes through woolen sweaters, coats, and blankets.

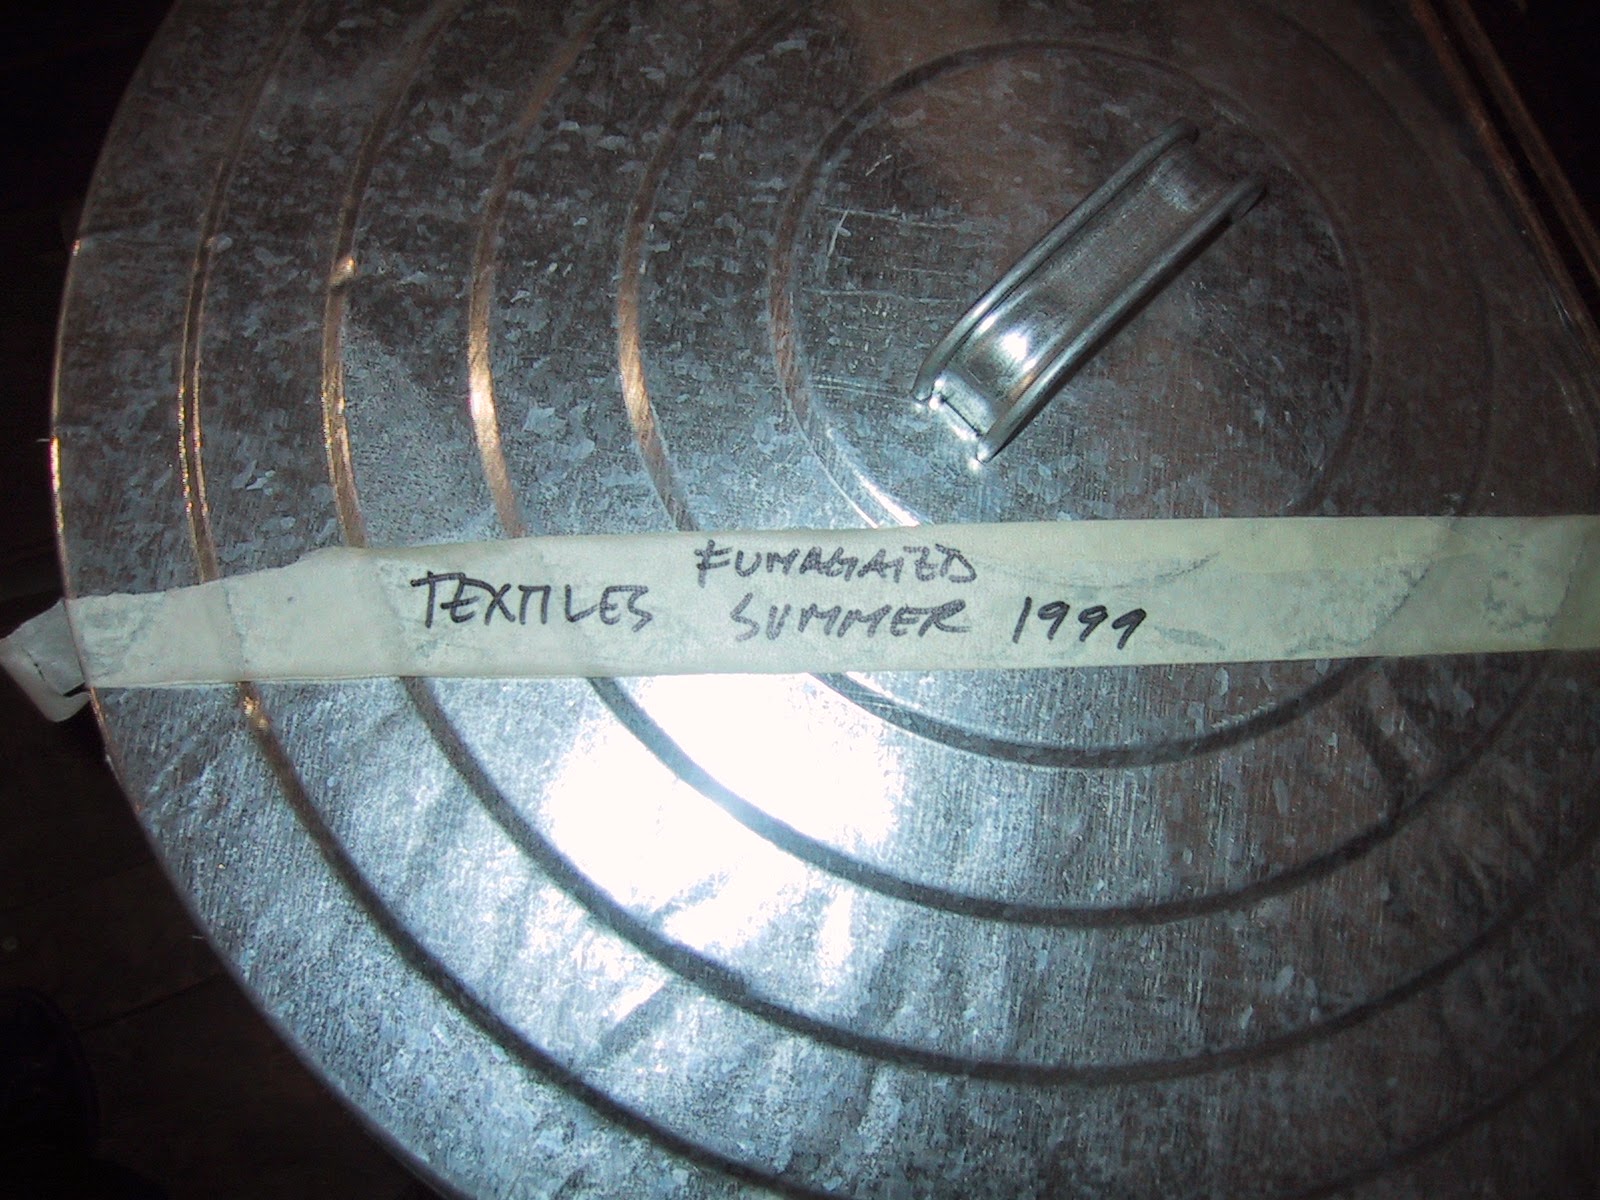
ABOVE and BELOW: These images are from some time ago, but really not so far back in history. The garbage cans are from a museum and the images were taken in 2007. The accepted process, which really stopped being used in the 1980's, was to fill a stainless steel garbage can with the textiles to be stored or "fumigated", add mothballs and seal the can.


Alternatives:
Here are some alternatives to help save valued items without resorting to poisonous mothballs or moth crystals. Clearly some options are not for fragile or vulnerable textiles:

Items should be placed in the clothes dryer on a warm cycle to kill any moth eggs, or if possible, periodically air them in the hot sun.
• Shake out and brush woolen items every three to four weeks (this step may not be practical for all of us, but the following steps certainly are). Clean items prior to storage as moth larvae rely on human soil products, like perspiration residue, for essential vitamins missing from pristine wool.
• Store clean, off-season items in airtight containers.
• Freeze infested items in a tightly sealed bag for 48 hours; thaw at room temperature, and repeat. Once fully thawed and dry, seal in an airtight container for storage.

Storing susceptible items in a cedar chest will help reduce damage caused by moths or mold. Cedar oil is a natural repellent of insects like moths; however, many older cedar chests no longer have enough aroma left to do the job. On the other hand, if the chest seals well and smells strongly of cedar, it will probably be a safe place to store items.

Toxin-free alternatives to control clothes moths include freezing, dry cleaning, washing in hot water, or thorough vacuum cleaning.


There is no one-time only procedure for keeping moths at bay. It is only through diligence and monitoring that moths can be kept out of, and off of, wool items. If you have wool items in your collection, inspect them carefully and protect them…but never with mothballs.

So what if you have already used mothballs? Or you are the lucky curator of the museum who just found stainless steel cans hidden in your collection which have not only irreplaceable textiles, but lots of mothballs, and subsequently that horrible mothball smell. The short answer is: Call a Conservator.

"Oh, Dear!"  Sadly, sometimes valuable or irreplaceable objects are protected with mothballs.


_____________________________
Gwen Spicer is a textile conservator in private practice.  Spicer Art Conservation specializes in textile conservation, object conservation, and the conservation of works on paper.  Gwen's innovative treatment and mounting of flags and textiles is unrivaled.   To contact her, please visit her website.

Thursday, September 25, 2014

Mold in museum collections is the environmental "canary in a coal mine"

A common issue found in collection storage is the presence of mold. Mold can unfortunately be found on collections, but also at times on the layers that are to protect collections. Museum professionals strive to keep their environment stable, their storage areas clean with good housekeeping practices, and surround their collections with archival materials. Yet mold out-breaks still can occur. So why does this happen, particularly if the protective layers are archival, and the environment is being monitored?

mold growth in museum collections, art conservation
ABOVE: Mold growth on a military jacket. The jacket
was displayed on a mannequin form under glass bonnet.

It turns out that mold is a tricky organism, and it wants to live. And given a chance, live it will. And of course, museums have in their collections the perfect materials for those tenacious spores to live and set-up house.


"Microscopic molds are both very beautiful and absorbingly interesting. The rapid growth of their spores, the way they live on each other, the manner in which the different forms come and go, is so amazing and varied that I believe a man could spend his life and not exhaust the forms or problems. 
— David Fairchild
The World Was My Garden (1938, 1941), 55.

All organic materials (and even some inorganic materials) will support mold, with natural fibers being the most susceptible. Mold is a microorganism that produces enzymes that convert the cellulose in fibers to soluble sugar that is metabolized as food. Proteins are generally less susceptible, but keratinophilic fungi will feed on, and damage, these fibers as well. Mold is found first on soiled areas, but also on materials that are starched, sized, have brightens, or have in the past been treated or exposed to some substance that is still present. And sadly, all mold growth creates a permanent, irreversible stain. (See below).


Mold on artifacts, museums, collections, art conservation, before conservation image
ABOVE: Before treatment
After art conservation treatment to get rid of the active mold growth. The mold has left  behind permanent stains.
ABOVE: After treatment

The photos on the left and right show mold on paper. While the mold has been reduced substantially, the permanent stains it has left behind are now part of the object.


RH = Relative humidity is a measure of the capacity of air to hold water. This amount varies as temperatures increase or decrease


Mold is omni-present and if mold is not actively growing, its spores are always in the air waiting for the ideal conditions so that they may grow. Ideal conditions for mold growth are relative humidity (above 65% with a temperature of 75 F or above (25 C). Humidity is by far the most important factor in facilitating mold growth, and if the you have an 80% RH you can be certain that mold is actively growing and it is spreading.  However, keep your temperature below 65 degrees F and your relative humidity below 50% and your collection will be quite safe.


Expert collection care, surveys and assessments by Gwen Spicer of Spicer Art Conservation
ABOVE: this printout shows a 7 day record of temperature (in red) and the RH (in blue).

However, even at moderate conditions, an outbreak can start in a surprisingly short time. Ideal conditions for mold growth are slightly different for each mold species but mainly within this "sweet spot" of above 65% RH/75 degrees F. But remember that mold is tricky, in fact, mold growth has been noted as low as 50% RH. How can this be? Mold shouldn't grow at 50% RH!  Well, because mold is everywhere and it is a survivor, and the typical museum can not create/afford a "clean room" like those used in hospitals or high tech industry. Therefore, museums rely on creating an environment that is not conducive to growth. Key to this is keeping the relative humidity down. However, it must be noted that if a collection or an artifact has already been affected by active mold in the past, there is an increased chance of a breakout at a lower relative humidity. Think of the later mold moving into an already furnished apartment, everything they need is already there, they just need to move in where their "roots" had successfully taken hold in the past.

Art conservation, mold removal, proper storage of artifacts
ABOVE: Sneaky mold. Here are three of the same types of artifacts, same material
(wood), same time period, same storage area. Yet, the artifact in the middle is almost
entirely untouched by mold while its sandwiching neighbors are nearly covered.   

Determining an actual set point for ones storage environment can be difficult as that there are many factors that are in play. One might even read conflicting recommendations. One of the issues is the amount of ventilation that an area receives. As that storage rooms are broken up by all sorts of cabinetry and shelving units, both open and closed, micro-climates can easily be created. This can especially be the case in historic structures with older HVAC systems of any kind.

The other issue, is how dirty artifacts are in the collection. The artifacts, especially in historic collections, have had an earlier life that includes the acculmative soiling and embedding dirt. All of which, mold spores love! So, even with good and regular housekeeping mold can still appear. 


As stated earlier, mold is tricky and sneaky. Perhaps you have done all of the right things and there is still a persistent out break. Well, there could be inherent issues of moisture that are beyond the specific room. A roof leak nearby, a damp basement, a leaky pipe, etc. Do not over look these seemingly small or large problems that are outside of the immediate vicinity of a mold outbreak. I have frequently come to an institution because of a mold out-break, only to find that it is the canary telling them that something else is going on.


Proper environment, historic structures, art conservation, mold in collections
Historical structures come with historical foundations. This
particular historical property experienced water in their basement
causing the RH to rise, causing…you guessed it, a mold outbreak in
the rooms and floors above. Did we mention that mold is sneaky?

Therefore, take any presence of mold seriously, keep your relative humidity down as low as possible, learn how the air moves in your storage space, be diligent in housekeeping, and know the "food" mold likes to eat.

Food sources for mold:
  • soiling and dirt on the surface of the artifact.
  • starch or other finishes that have not been washed out. Pre-washing muslin and even the twill tape has been found to be critical to remove these finishes.

Mold outbreak, museum storage, collection care, art conservation
ABOVE (top and bottom photos) Muslin wrapped, rolled textiles with mold on the surface of the wrapping.


LEFT: Image of detection of mold on unwashed muslin. UV light shows the mold is quite pervasive. So while the museum has done a great job of housekeeping and their storage is thoughtfully organized, the muslin coverings of their carpet/rug collection was at risk for a pervasive mold outbreak simply because the muslin was not washed prior to being used.

RIGHT: Another image of UV light to detect mold growth. This mold is growing on the twill tape straps. The twill tape was not washed prior to being used to tie the ends of the items in rolled storage.

Several years ago, the National Park Service produced a conserve-o-gram that focused on mold. Read it here. And the Smithsonian talks about mold here, which is also good reading to know more about the fungus among us. Lastly, Alaska State Museum's (ASM) experience with mold, or what they affectionately term, "white stuff", has been well documented and researched. ASM has experience and know-how about mold and how sneaky it can be - read about their battle with mold and the vigilance with which they maintain their collection here.

Do you have a mold success story? Do you have a mold challenge that seems unmeetable? The options for treatment and the factors to consider when determining how best to treat objects, textiles, or paper are numerous and often case specific. If in doubt about how a moldy artifact should be treated, call a conservator. We are always here to help!

_____________________________
Gwen Spicer is a textile conservator in private practice.  Spicer Art Conservation specializes in textile conservation, object conservation, and the conservation of works on paper.  Gwen's innovative treatment and mounting of flags and textiles is unrivaled.   To contact her, please visit her website.

Tuesday, September 9, 2014

Conservation of Victorian Hair Art

Hair wreaths are a symbol of the Victorian Era. While many have some unique features, they mainly follow a standard look. They are most often created in a horseshoe shape, mounted with the open side up to "hold good luck". A woman of this era would often make a hair wreath as a demonstration of her handiwork. The hair included in the wreath was often from family members, however if you were short on hair it could, of course, be ordered from a catalog. Also found in catalogs were various types of flowers, leaves, and methods of creating designs with the hair.
An close up example of Hair Art


ABOVE: An example of a hair wreath done in a style that is quite
thin and wiry. It does however feature the typical horseshoe.
ABOVE: Another traditional hair wreath, but with an interesting feature. At the center sits a bird with
colored feathers, in its beak a piece of twisted hair. The hair in this wreath is densely placed, and
while many flowers are in similar colors, a few different shades can be found.  

I have seen very few examples like the hair work that came to the studio recently (see below). This type of work is in the French style, and has been referred to as "French Palette work" or "hair feather design" perhaps because it does bear resemblance to still-life works created with bird feathers.

Art conservator, victorian hair art, repair and restoration of antique frames and collectible works of art
ABOVE: Here is the French-style Victorian hair art after treatment.

What makes this French-based art work so different than the typical hair work from the United States in that it has absolutely no wires. Instead it is composed mainly of full, large, locks as the focal point, with smaller pieces cut and glued into a design, with a feature of leaves or flower petals, which are pieces of hair laid flat, glued to a paper surface, then cut into the shape desired. The entire work is then glued to glass.

Art conservator, Victorian hair art repair and restoration.
ABOVE: Up-close of the French hair work when it arrived in our studio. You can see the loose pieces as
well as the loss from the cut leaves and flower petals.  Also obvious is the glue that has yellowed over time.

Objects art conservator, Gwen Spicer carefully removes dirt and debris from this Victorian Hair Art
The swab shows the dirt that has built up. Also obvious is the faded initials "E. O."
which were obscured by a loose tendril of hair. 

After the paper board was removed from the back of the frame,
pages of a book, written in French were found.

Hair is still a way to express yourself artistically. Not only are some brave souls trying to figure out the way Victorian hair art was created, there are plenty of modern artists who use hair as their creative medium, like the example below.  

Amazingly these leaves are made of hair by artist Jenine Shereos.
See more of this and other amazing work at www.jenineshereos.com

To see some other ways hair is currently used in art, visit this fabulous blog: http://www.artisaway.com/blog/hair-as-a-fascinating-theme-in-art-fashion-and-design/ it shows several examples of some absolutely amazing modern hair art.

If you would like to know a little more about Victorian Hair Art, visit these sites:
http://textilecollection.wisc.edu/featured_textile_articles/hair_wreath.html

http://www.leilashairmuseum.net/history.html

_____________________________
Gwen Spicer is a textile conservator in private practice.  Spicer Art Conservation specializes in textile conservation, object conservation, and the conservation of works on paper.  Gwen's innovative treatment and mounting of flags and textiles is unrivaled.   To contact her, please visit her website.