Flag conservation

Flag conservation
Textile conservator, Gwen Spicer of Spicer Art Conservation at work
Showing posts with label Housekeeping. Show all posts

Saturday, March 20, 2021

A simple vacuum revolution

 I have recently had an 'Aha!' moment. I have always struggled with the small attachment tool for vacuuming. Untill now!

You know that wonderful, handy and inexpensive micro-tool that comes with the many small changeable tools. I realize that part of my struggle when using it, was the narrow-long plastic tube that linked the small attachment brush to the vacuum cleaner connection. It always seemed like I needed a third hand,  because two hands were needed to manipulate the tubes, but one was still needed for the tweezers, the micro-tool and the like.

Why does this narrow tube need to be so long, I thought? Really a new thought. The innovation is just to  cut the tube. So I did this, and Voila! Now less of the tube to manipulate, it simply connects the two sections of the micro-tool. Now, one hand is free to hold the vacuum attachment and the other for other tools that I might need, such as tweezers.


Thursday, January 29, 2015

Creepy, crawly, and hidden in your collection?

Recently SAC posted a couple of images of a moccasin that got some attention. Mainly because many were interested in what was found in the "out of sight" parts of this artifact. The moccasin (pictured below) was purchased ca. 1923 and was believed to be made by the Onondaga for trade purposes. Is is one of a pair that are made of semi-tanned leather and elaborately embellished with glass beads.

art conservation, native american bead work, restoration
The beaded vamp of the moccasin before treatment.


insect damage to artifacts, art conservation, pest management in museums
The underside of the vamp before treatment. Here you can see that the wool layer (which should be between the leather and the vamp) is missing. The small dark regions are the moth casings. 

Traditionally, when a moccasin like this was being made, the glass beads were sewn to sandwiched pieces of paper and leather that would make up the decorative pieces of the vamp and cuff. These parts of a moccasin were typically embellished separately before being attached to the moccasin. To cover the backside of the stitching of the beads, a wool layer was commonly used to line these sections. In the case of this moccasin, the wool layer is missing, because it had been breakfast, lunch, and dinner for some hungry webbing clothes moths. Delicious!

These little, but incredibly voracious bugs have long departed from this moccasin, leaving behind the remnants of their stay: the casings in which they morphed from larvae to moth. Like most infestations, there is no simple way to know when this infestation occurred.  What is important now is that the infestation is inactive. However, as evidenced from the amount of casings found, these moths certainly were very happy when they were here.

The lifecycle of a moth.

You may wonder what it was about this location (i.e. under the vamp) that made the moths so content to stay. Webbing clothes moths (and other pests) prefer to be left alone and undisturbed. They also really like dark locations, and if the location is slightly damp and warm, it is even that much better! The fascinating part here is that webbing cloths moths also like to graze the surface of semi-tanned leather, but in this case there is no evidence of this type of damage. Therefore they were content with the wool alone.

From the exterior of this particular pair of moccasins, you would not be able to detect what was within the layers below the surface. However, being aware of the placement of the wool layer both under the vamp and cuff, and knowing that it provided a paradise location for pests, helps to understand safe storage/collection management for this particular artifact in the future.

So how do you prevent this type of damage from occurring with your artifacts? You need to practice IPM, otherwise known as Integrated Pest Management. The basic philosophy of IPM is to make your environment as inhospitable to pests as possible and to avoid the use of chemicals (read our recent post on moth balls). An inhospitable environment can be accomplished with these simple steps:

1. Inspect and "disturb" your artifacts regularly, particularly those that might be enjoyed most by pests.
2. Treat your vacuum as your best friend and use it often.
3. A cold and dry location is the best location to store your artifacts.

It is always best to avoid pest problems rather than reacting to infestation.  Remember the motto of IPM:       
"Prevention is better than cure"

If you want to know more about museum pest management check out this website: http://museumpests.net

And if you cannot help but find humor in museum pest management, you must see Historic Cherry Hill's youtube video to better understand the insect's point of view!

_____________________________
Gwen Spicer is a textile conservator in private practice.  Spicer Art Conservation specializes in textile conservation, object conservation, and the conservation of works on paper.  Gwen's innovative treatment and mounting of flags and textiles is unrivaled.   To contact her, please visit her website.

Thursday, October 23, 2014

Mothballs, yuck.

by Gwen Spicer

Over the years I have seen mothballs in many collecting institutions and client homes. They are a true "left-over" from a time in the twentieth century where chemicals were thought to solve all of our problems. While mothballs and other chemicals gave the appearance of solving some problems, what they really did was produce a great deal more!

Mothballs.  No one should use them, EVER.

Our awareness of the hazards of chemicals is still quite new. We all have Rachael Carson to thank for her timely publication "Silent Spring" in 1962. It woke us all up to the danger and harm that we were doing to our environment and ourselves. Sadly, it may have not been widely read. 52 years later we continue to use harmful products thinking we are somehow helping.

Rachel Carson, truly a voice ahead of her time.


After Carson's book, laws were quickly enacted that stopped or limited the use of the most harmful chemicals and pesticides, especially the use of DDT. However, many others still remain on the market. Mothballs are one of these. The little white balls of toxin have been used for decades to deter and kill moths and other insects from damaging wool textiles.

The definition of a mothball is as follows:

Small balls of chemical pesticide and deodorant used when storing clothing and other articles susceptible to damage from mold or moth larvae. They come in two different formulations; one, using naphthalene, and the other using paradichlorobenzene as the active ingredient. Naphthalene, a hydrocarbon derived from coal tar, which easily exudes gas, acts as a fumigant.

So why are mothballs hazardous to your health? Several reasons:
 Naphthalene fumes may overwhelm a child wearing a sweater recently removed from a chest containing mothballs. Inhaling the chemical can lead to nausea, vomiting, fatigue, headache, fever, confusion, and fainting. Routine exposure can cause a condition called hemolytic anemia, where a person's red blood cells get damaged. Ingestion or skin exposure causes more extreme reactions in the liver and bladder, causing jaundice, lightheadedness, and eventually leading to coma. Not surprising, but cigarette smoke contains the chemical, which as we know can lead to cancer. So really, there are no health benefits associated with naphthalene.

Toxic nature and damage from use:
Older mothballs consisted primarily of naphthalene, but due to naphthalene's flammability, many modern mothball formulations instead use 1,4-dichlorobenzene, which may be somewhat less flammable. The latter chemical is also variously labeled as para-dichlorobenzene, p-dichlorobenzene, pDCB, or PDB, making it harder to identify unless the purchaser knows these synonyms. Both of these mothball chemicals have the strong, pungent, sickly-sweet odor often associated with mothballs.

Both naphthalene and 1,4-dichlorobenzene are the main ingredient in mothballs because they undergo sublimation, which means that they start in a solid state which evaporates directly into a gas; this particular gas is toxic to moths and moth larvae, hence it is an effective pesticide.

Another version of a mothball, and just as dangerous, is moth crystals. They are made exclusively from paradichlorobenzene (PDB), which is considered even more toxic than naphthalene. Regardless of their toxicity, both chemicals are a poor choice for storage because prolonged exposure of PDB vapors on plastics may melt them, affecting some sweater boxes and other types of plastic; it is therefore not recommended to use on clothes with plastic buttons or decorations. The effects of PDB on humans are not well known, but it is a suspected human carcinogen because it has been shown to cause cancer in animals.

An all-too-common sight.  Mothballs and the clothes they
are "protecting" sealed tightly in a plastic container

For the insecticidal chemicals of mothballs to be effective, they need to be placed with the clothing in a sealed container so the vapors can build up and kill the moths. In a sealed atmosphere like this, the vapors are not as harmful to people because they are relatively contained. The main exposures would occur when filling or opening the containers, or from wearing clothes immediately after opening (especially a problem for infants).

Naphthalene mothballs and 1,4-dichlorobenzene mothballs should not be mixed, as they react chemically to produce a liquid (rather than sublimating) that may cause damage to items being preserved. Should this happen to your artifact, the outlook is grim. :(

If that is not bad enough, there are things that make mothballs even worse. Wet mothballs are even more potent than dry ones. And the wetness can be profound, like exposure to water from a flood or leaky pipe, or mild, in the form of high humidity. Either will cause the odor to be more potent and sublimation to be more rapid. This increase in potency puts the person treating or washing the garment at more risk. Similarly, sometimes the garment has not been in moth balls for a long time, but upon wetting for treatment, the chemicals that had been absorbed inside the fibers and had sat dormant, are released. Textiles are not the only at-risk items for chemical absorption. Wooden cabinets, shelves, or drawers also have the propensity to absorb the harmful chemicals.

In addition to repelling or killing insects such as moths and silverfish, mothballs have been suggested for use as a stovepipe cleaner, a snake repellent, and to keep away mice or other pests. This of course is a terrible suggestion. A quick information search will show you that placing mothballs in the attic, or other areas of your home only results in the family dwelling there to become horribly ill.

Another major concern about the use of mothballs as an animal repellent or poison is their easy access to children, pets, and beneficial animals. Leaving them in a garden or in a living space unprotected makes it very easy for unintended victims to gain access to them. Mothballs are highly toxic when ingested (they have a sweet odor and taste, making this more likely), and will cause serious illness or death.


Now that you have read the above information and never want to use mothballs again, let us talk about the alternatives and why so many people prefer to use safer, more natural remedies to rid themselves of those pesky moth larvae that can eat holes through woolen sweaters, coats, and blankets.

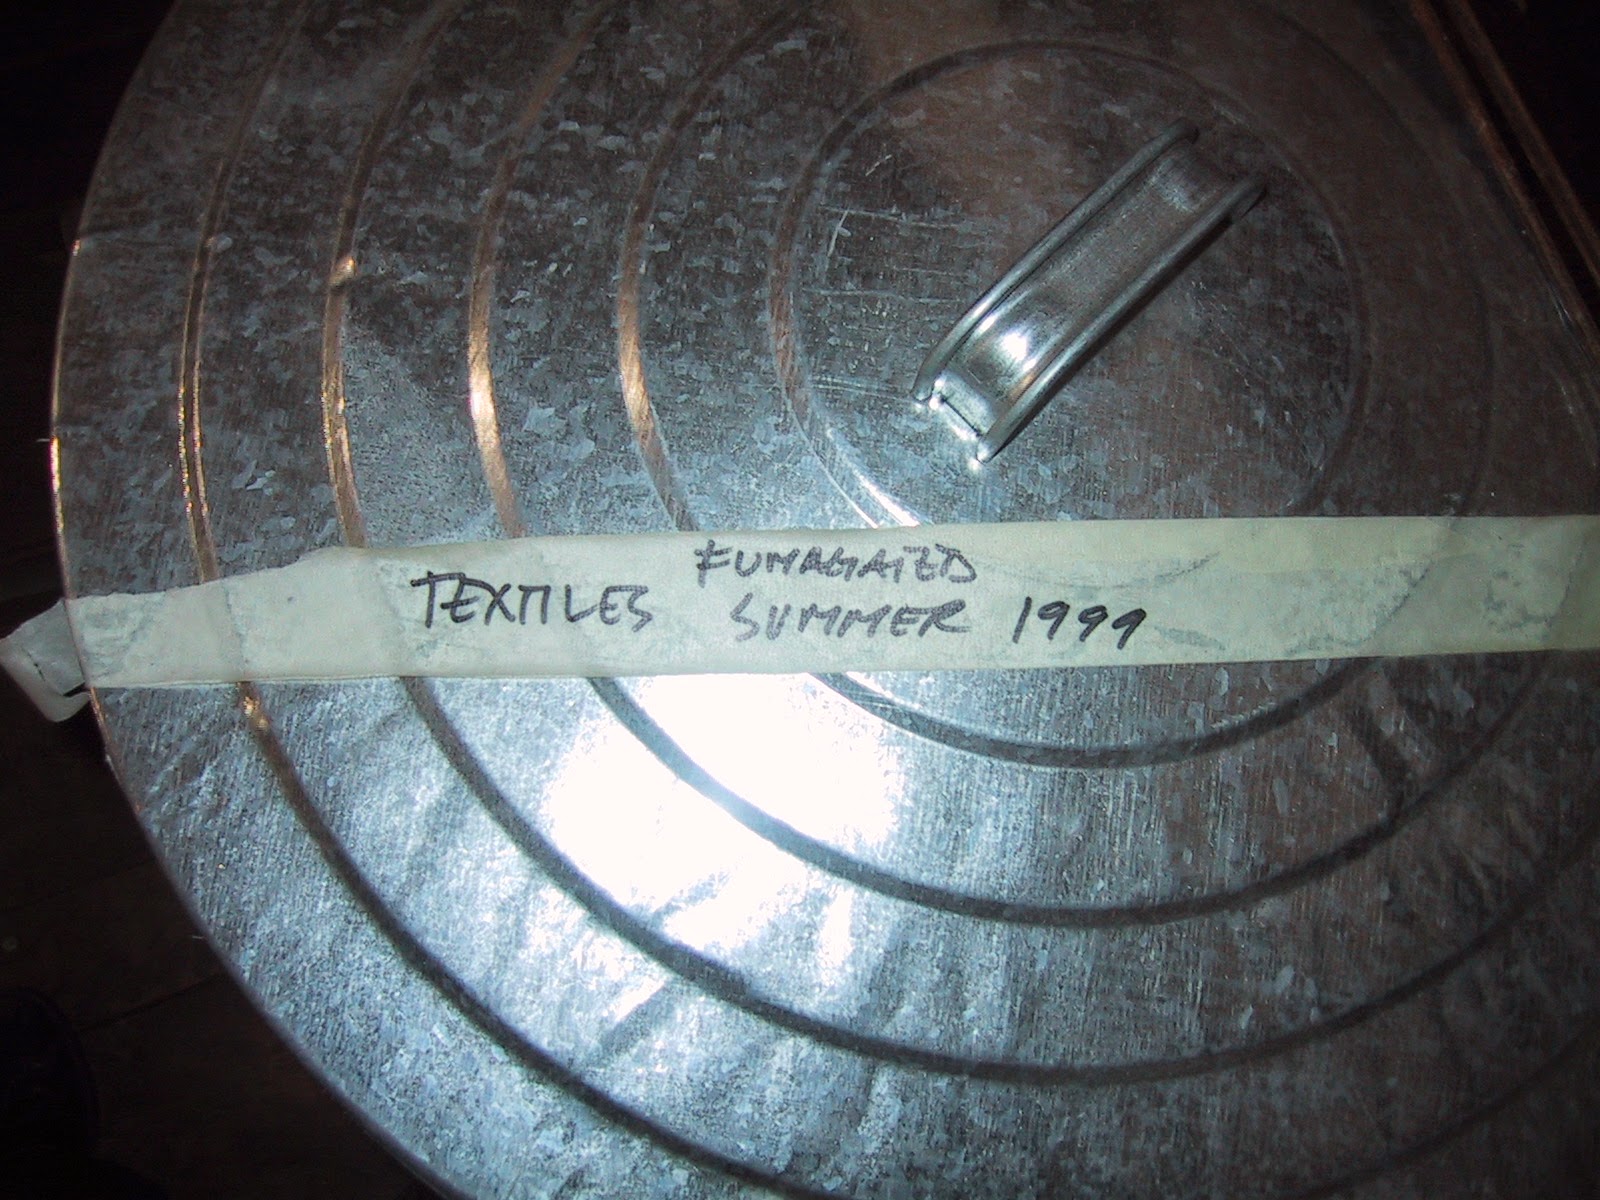
ABOVE and BELOW: These images are from some time ago, but really not so far back in history. The garbage cans are from a museum and the images were taken in 2007. The accepted process, which really stopped being used in the 1980's, was to fill a stainless steel garbage can with the textiles to be stored or "fumigated", add mothballs and seal the can.


Alternatives:
Here are some alternatives to help save valued items without resorting to poisonous mothballs or moth crystals. Clearly some options are not for fragile or vulnerable textiles:

Items should be placed in the clothes dryer on a warm cycle to kill any moth eggs, or if possible, periodically air them in the hot sun.
Shake out and brush woolen items every three to four weeks (this step may not be practical for all of us, but the following steps certainly are). Clean items prior to storage as moth larvae rely on human soil products, like perspiration residue, for essential vitamins missing from pristine wool.
Store clean, off-season items in airtight containers.
Freeze infested items in a tightly sealed bag for 48 hours; thaw at room temperature, and repeat. Once fully thawed and dry, seal in an airtight container for storage.

Storing susceptible items in a cedar chest will help reduce damage caused by moths or mold. Cedar oil is a natural repellent of insects like moths; however, many older cedar chests no longer have enough aroma left to do the job. On the other hand, if the chest seals well and smells strongly of cedar, it will probably be a safe place to store items.

Toxin-free alternatives to control clothes moths include freezing, dry cleaning, washing in hot water, or thorough vacuum cleaning.


There is no one-time only procedure for keeping moths at bay. It is only through diligence and monitoring that moths can be kept out of, and off of, wool items. If you have wool items in your collection, inspect them carefully and protect them…but never with mothballs.

So what if you have already used mothballs? Or you are the lucky curator of the museum who just found stainless steel cans hidden in your collection which have not only irreplaceable textiles, but lots of mothballs, and subsequently that horrible mothball smell. The short answer is: Call a Conservator.

"Oh, Dear!"  Sadly, sometimes valuable or irreplaceable objects are protected with mothballs.


_____________________________
Gwen Spicer is a textile conservator in private practice.  Spicer Art Conservation specializes in textile conservation, object conservation, and the conservation of works on paper.  Gwen's innovative treatment and mounting of flags and textiles is unrivaled.   To contact her, please visit her website.

Friday, June 21, 2013

The conservation of textiles or objects often begins with dirt, dirt, and more dirt

by Gwen Spicer

At the end of the day, does your collection of swabs look like this?

conservators tools, cleaning artifacts, embedded dirt in collections, antiques, antiquities and heirlooms,

Much of the work that conservators perform on collections is removing surface dirt. Either mechanically with swabs, picks, or brushes; or capturing with vacuums. Much of this dirt has been accumulating while the artifact has been at the museum (often called "museum dirt") and is not the dirt that is associated with use or historical significance.

Summer begins today and with it comes a very busy time at historic homes and museums. Smaller institutions with a limited open season see all of their visitors in this short time before they close down again for the cold months of winter. So what kind of effect does this quick and short influx of visitors  have on these places? The answer is that the extra traffic can have a profound impact, but if great care is taken to monitor for dust and dirt, then that impact can be made minimal. This is true not just for the small institution, but for the large institution as well where visitors are seen year-round.
antique wooden travel chest, museum collection care, art conservator needed
This chest is covered in animal hair, but along with it, is dust, (lots of it) and closer inspection reveals insect and water damage.  Prevention could have made a substantial difference here.

Common dust components can be anything from soil, soot or insects (that perhaps you would expect to find), to the hair and skin particles from humans or animals, to the paint or plaster from a home, or could be things like particles of paper, food, fiber, or heaven forbid - mold. Dust is bad enough by itself, and this is nothing new as Susannah Whatman, in her iconic housekeeping book of 1776, so aptly indicated when she said, "Places where dust lodges should be attended to. Otherwise, if left too long, it takes a long time and much labor to get it off". Is there something worse than leaving dust undisturbed for too long? Yes, and it is a simple and deadly equation: Dust + Humidity = "dirt cement" = hard or damaging to remove. This is why a favorite saying in conservation is: "Prevention is better than cure".

Sticky samples to the rescue! Simple prevention does not get simpler than this. Sticky samples collect and show the evidence of what is in the environment. Most importantly they indicate how often an area needs to be cleaned. It should be of no great surprise that when the samples below were examined, the samples farthest from the visitor "rope" showed less dust pollutants. The moral of the story here is to put the objects you want to clean less, farther away from the traffic flow. Another interesting tidbit is that the samples at the beginning of the tour have much more dust than the sticky samples at the end of the tour.  Of even further interest is that the sticky samples on the floor have far more dust collected than the samples on a table or up even higher. In fact 4 feet from the ground is the magic number. Here is the least "dusty" space.  However, move up above the average person's eye-level and things start getting dusty again.  This makes sense - when was the last time you looked at the top of your refrigerator?

The white squares indicate where tested, at regular intervals from the path of a visitor (the red rope is the limit of the visitors contact)


Is seems that there is a fine line between a historic institution having the right amount of dust (i.e. what is acceptable to the visitor vs. what comes off as making the institution look "uncared" for.) As conservators, curators, and archivists, we have all studied patterns of dirt and soiling migrations within environments. And as one might suspect, it is mainly the visitors themselves who bring the dirt and soiling into museums and historic homes. Folks like Mr. Peter Brimblecombe of the University of East Anglia, UK and others who have studied and monitored such things are able to provide us with the knowledge of how the movement and deposition of dirt and particulates damages historic homes, museums, archives and libraries.

But could there be a time when this is not the case? And a conservator's first step of treatment will not be surface cleaning or vacuuming?

Homes, work space, and other public spaces are all becoming more and more clean. Modern building construction is tighter to be more energy efficient. Windows are not made to open in some buildings because a HVAC system is in place, and these systems are equipped with sophisticated filters, able to wisk the air clean of particles and debris to the micron level.  Society itself has become more concerned than ever before with hygiene. There are biological antiseptic hand wipes, washes, and cleaners, all to keep our environments clean and germ free. Plus there are improved vacuum cleaners with fine particulate filters like HEPA and speed regulation.

art conservator gentle vacuum with low suction power

How is this going to effect a conservator's work in the future? Could it be that vacuuming as a first step not be needed? What do you think?

Notes: Housekeeping is one of my favorite topics and more will come, but it is impossible to talk about dust in its entirety in a brief blog post. If you want to read some wonderful articles, please visit Professor Peter Brimblecombe's web page where you will find links to his mountains of publications about dust, historical places and the environmental factors that can cause damage. He may be more passionate about housekeeping than I am!
_____________________________
Gwen Spicer is a textile conservator in private practice.  Spicer Art Conservation specializes in textile conservation, object conservation, and the conservation of works on paper.  Gwen's innovative treatment and mounting of flags and textiles is unrivaled.   To contact her, please visit her website.

Wednesday, February 6, 2013

Cleaning the textile wall coverings of Wilderstein, home of Ms. Margaret "Daisy" Suckley

by Gwen Spicer

I have known Wilderstein for many years now, mostly as a pleasantly preserved home of a woman, who happened to give a scottie dog to a former president.  Over the years it has gone through some drastic changes, like a coat of paint (it hadn't been painted since 1910), or a new roof that is actually water proof.  These improvements have all occurred under the loving attention of several devoted people, but especially Duane and Linda Watson, who are just two of the dedicated volunteers who keep Wilderstein going.

Wilderstein wall coverings,  textile, art conservation
This house is not just another estate that over looks the Hudson River, but behind the once weathered clapp boards is an interior that was attentively detailed by some of this country's most important fashion decorators of the later nineteenth century.
Art conservation of historic structures and interiors, The cleaning and repair of textile wall coverings, antiques, artifacts, antiquities
Ms. Suckley's (pronounced "sooklee") family spared no expense when building and selecting how their home was to be decorated, and of course only the best artisans of the time were contracted.  

Spicer Art Conservation has been helping Wilderstein for several years with bringing the fragile and dirty wall coverings of the home back to their former glory. The first room was the dining room, which due to water leaks was in great need of conservation. Then later the front parlor.

Art conservator at work, cleaning, restoration and repair of historic textile wall coverings, art conservation
Hard at work in the Dining Room

After treatment of historic textile wall coverings, Wilderstein, art conservation
Panel of Dining Room fabric
The two rooms feature original panels of weft-face woven fabric which covered the walls.  The parlor has 10 fabric panels made from silk and cotton.  The dining room has 15 panels of wool, silk and cotton or linen fabric.  In each room the panels were quite fragile and showed varying degrees of fading with layers of soiling and soot deposits as well as signs of general deterioration.  A note to this is, these panels were placed on the walls nearly 125 years earlier and for that kind of lifespan, the deterioration actually could have been much worse.  Perhaps that is a testament to using such incredibly well made fabric.  For the first generation Suckley's, it appears to be money well spent.

The dining room had suffered the most damage.  The floral print fabric was dirty, but had also been affected by webbing cloth moths, who had left their casings

behind.  The room had also suffered water damage from a long term leak.  This room also had many decorative features: wainscoting, intricate wood work, embossed and painted plaster, each which contributed to the detailed cleaning that would need to be done.  See the photo below: the left side shows the condition of the room prior to beginning the treatment, and the right shows the area that had, up to that point, already been cleaned.

During art conservation treatment of historic textile wall coverings, art conservator at work, repair, restoration of historic structures and interiors.
Detail of dining room ceiling and upper wall during treatment.  

Art conservators at work, historic interiors, textiles, conservation, repair, restoration
Notice the color of the parlor ceiling, seems like it could have blended very well with the "hidden" fabric.
The parlor, which could be referred to as a gold-colored room revealed some surprises about the true original color, which was (as you may have guessed) not gold.  The images below reveal small hidden sections of the fabric.  The closeup below is of the fabric hidden behind the gimp (aka the edging trim). Here you can see cream, mauve, pink and some blues.  When you view the ceiling in this room (see photo immediately above), the color of the hidden fabric "makes sense".

Antique textile wall covering, art conservation, repair and restoration,
historic wall covering, textile, art conservationWhile still very faded, glimpses of the original colors in the wall covering fabric is evident where a frame once covered this section of wall (see images left and below).

art conservation of historic textiles, determining true original color of antique textiles

The Suckley house has unique issue which contributed to the condition of the wall  coverings.  Any house built before gas and oil fired furnaces, used coal.  The coal dust went everywhere and attached to  everything.  You see, it is the oily nature of the coal dust which allows it to adhere especially well to all types of surfaces, but especially textiles.  It is a gradual build up that is not noticeable at first, but after years of buildup, it becomes impossible to miss.  To add to the issue, the coal dust can also be trapped in duct work.  Which means long after a system has been transferred or changed to another fuel source, the oily coal dust is still being sent throughout the house (this would be especially damaging if the system was switched to forced air heat).

When this project was completed, we had treated 444 square feet of fabric in the parlor, and another 144 square feet of fabric in the dining room.  To get a sense of the magnificence of this house as it once was truly was an amazing experience.  It is a wonderful place and one can easily see how it was a beloved home to generations of Suckley's.

True, historic homes dot the landscape all across the Hudson Valley.  And until recently, Wilderstein was just one of those many homes.  However, Wilderstein got a recognition boost recently with the awareness of it's former owner and her relationship to FDR in the movie, "Hyde Park on Hudson" where the relationship between Ms. Suckley and President Roosevelt was fictionalized.  Nonetheless, spending time at Wilderstein, getting to "know" the house, and knowing how important it was to Daisy Suckley, it was so wonderful to see Ms. Suckley "come to life" in this film, as I never had the privilege to meet her.

If you would more information about Wilderstein, visit their website here:  www.wilderstein.org.  If you would like to read more about Wilderstein, check out the story written about Daisy Suckley in the New York Times here: http://tmagazine.blogs.nytimes.com/2012/12/19/ghosts-of-the-hudson-valley/ .  And if you have the chance to get to Wilderstein when it opens in the Spring, I recommend it highly.

_____________________________
Gwen Spicer is a textile conservator in private practice.  Spicer Art Conservation specializes in textile conservation, object conservation, and the conservation of works on paper.  Gwen's innovative treatment and mounting of flags and textiles is unrivaled.   To contact her, please visit her website.

Wednesday, December 12, 2012

Vacuum Vexations and Victories while conserving a large hanging textile


How many times does it take to safely vacuum an 18' x 18' projection screen?  That was the question we asked ourselves on Tuesday while working on-site at the Thomas Edison National Historical Park in West Orange, NJ.

Thomas Edison's Laboratory, textile conservation of lab coat and projection screen
Thomas Edison Laboratory, view of original archway and water tower.


Thomas Edison Laboratory, Library exterior

Projection screen conserved by textile conservator, Spicer Art Conservation projects
The screen while rolled.  (It is the cylindric tube spanning
across the top of the clock and upper windows.)
We arrived Monday, December 10th for a four-day stay in New Jersey for the primary purpose of cleaning and repairing the two-story high projection screen located in Edison's library.  The library itself is three floors high and houses remarkable documents attesting to Edison's various certifications and honorary awards, along with numerous volumes dating back to the late 1800's, as well as the screen where Edison would show films to those who visited his laboratory complex.  Needless to say, I found myself overwhelmed and consumed by sheer excitement about the pieces of history surrounding me as I walked around the library to take various photos of the screen, as seen to the left and below.


Art conservation of Edison's laboratory projection screen, historic sites, textile repair and restoration
The screen fully unrolled
The beginning of the treatment process was very simple.  Using the vacuum we brought from the studio, I systematically cleaned the front and back of the bottom portion of the screen while Gwen followed behind with the soot sponge to further loosen any embedded particulates.  The bottom portion of the screen is considerably darker, as seen in the picture above, which we determined was purposefully stained either as a protective coating or as a visual countermeasure to the shadows cast by viewers' heads.  This is only speculation, due to the fact that we do not have an original photo of the screen.  Of course we did not wish to remove this discoloration, only the dirt and dust caked on the surface.  To the knowledge of current park employees, it had been 15-20 years since the last time the screen was unrolled.

Working along, I proceeded to vacuum ever higher with the assumption that when I reached a certain point I would be able to safely proceed with the screen's treatment.  However, such was not exactly the case.  Within the last year or so the site had discarded their backpack vacuum, as well as their scissor lift.  We were then told that it was possible to set up scaffolding behind the screen that would allow me to reach the very top of this immense canvas.  But of course, the scaffolding was not available for our use, and no one had a clue where it was.

Taped attachment

Now here was the predicament: how do I stand on a ladder while holding a small, but still weighty, piece of equipment for an extended period without risking my life in the process?  Holly, one of the park employees, was so kind to find a potential solution to my predicament.  She brought a 3M vacuum, which I could swing over my shoulder.  However, the 3M vacuum unsurprisingly no longer had any of its original brush attachments or a wand extension.  So what did Gwen and I do?  We improvised!  Holly Marino, who works at the Edison site, brought us a wand attachment from another machine which we taped to the hose, then we taped our brush attachment to the wand!


Example of 3M vacuum with only crevice tool

I proceeded to climb up our little step ladder and extend the wand in order to vacuum the backside of the screen as far as I could reach.  It was not long before I started to notice significant cramping in my arm and the strap cutting into my left shoulder, not to mention how awkward it was to maneuver with this huge black box swinging freely around my hips catching on everything.

In addition, I could not control the suction power, which not only resulted in an almost deafening noise, but was also not ideal for the artifact.  After cleaning what I could reach on three of the six canvas panels, I got down and said, "there has to be a better way to do this!"

"the contraption"
On to improvisation part 2.  We removed the wand from the now dubbed black box of misery and attempted to attach it to our vacuum, but only to find that the inner ridge on the wand prevented us from simply connecting the two parts.  We taped the two together, but it was clear that the contraption was nowhere near strong enough.  I indicated to Gwen that I needed a splint of some sort to fix the issue.  She looked around our tools and offered first the small 1/8" thick sticks we use for swabbing, then metal micro-spatulas, both of which I rejected as insufficient support for the task saying, "I need more reinforcement than that!"  After a few seconds Gwen returned with a small chip brush that I taped to the wand and hose as she held it in place.  At this point both of us are giddy with amusement at the lengths we have had to go to so far to come up with a solution.  But that was just the beginning.
Vacuum splint 
Now that the issue of extending my reach was solved, we had to next figure out how to rig the body of the vacuum to the ladder to free my hands for the task.  Gwen had brought small bungee-cord-like elastic bands that I used to hook the vacuum to the step ladder, which worked as I finished doing what I could of the last three panels.  However, I still had over nine feet above me that I still could not reach.  Now it was time for a taller ladder.  With the assistance of another park employee, Walter Baginski, I retrieved a 10' ladder, brought it into the library and slid it under the tables supporting the bottom of the screen and stood it up successfully behind the screen.  The problem arose again of how to keep the vacuum up there with me.  With some clever thought on my part (not to pat myself on the back or anything...wink, wink),  I removed the support strap from the bulky black 3M box and strung it through our machine's handle.  Carrying it up the full height of the ladder, I was able to secure it to the top with the strap, as well as, some of the elastic ties from before.  Gwen handed me the wand and hose, which we had disconnected beforehand, and upon reattachment I was finally good to go!  With the wand fully extended, and standing on the top step of the 10 foot ladder, I was just able to reach the top of the screen and finally vacuum the screen with confident speed, all while Gwen and I are laughing at how ridiculous things get, and the improvisation needed when working on-site away from all your usual tools.

vacuuming large textiles, art conservation, Edison, projection screen
Me at the top of a 10-foot ladder after finally securing the vacuum to the very top.
Thank God I'm not afraid of heights!

Here I am when all is said and done, finally vacuuming after all that hassle, and still with a smile on my face, because after all my effort I was victorious and could proceed with relative ease.  The lesson of the story is of course: where there's a will there's a way.  And my own personal inspiring quote: "Be the hero with a smile on your face because life is too short to sweat the small stuff, or in this case the big and tall stuff!"

written by Nicolette Cook, Assistant Conservator, Spicer Art Conservation, LLC
_____________________________
Gwen Spicer is a textile conservator in private practice.  Spicer Art Conservation specializes in textile conservation, object conservation, and the conservation of works on paper.  Gwen's innovative treatment and mounting of flags and textiles is unrivaled.   To contact her, please visit her website.

Tuesday, October 2, 2012

Wet Umbrellas!

by Gwen Spicer

I remember the first time I saw a method of containing a wet umbrella.  It was in 2007 and I was in Taiwan, entering a metro station near the National University in the capital.  There at the top of the escalators was a dispenser of plastic bags, made to easily slip over an umbrella.  Later, I was entering a ceramics museum and an even more elaborate vehicle for umbrella containment was there.  In this version, you plunged your umbrella into the contraption, and it instantly enveloped your umbrella in a tight-fitted plastic (or shall we say "rubber") sleeve.  This was great, no wet drips on the floor as you walk to the coat room.  I thought, "Wow, here is a very organized country in a tropical climate".  True in the United States we don't quite have that sort of climate and perhaps not nearly that level of rain.  However, this simply means we are at an umbrella wrapping disadvantage.

Why do you ask is it so important to wrap your umbrella?  Let me tell you...
 Taipei County Yingge Ceramics Museum (2007)

I have since seen many other solutions in other countries and in the United States.

Ibere Camargo Museum, Porto Alegra, Brazil (Spring 2008)

Umbrella bags at the NMAI's Suitland facility. (Summer 2012)


Outside a historic house