Flag conservation

Flag conservation
Textile conservator, Gwen Spicer of Spicer Art Conservation at work

Wednesday, September 18, 2013

A Ukrainian Boudoir Doll

by Nicolette Cook, SAC Conservation Technician

Recently, while working on a striking Ukrainian doll, it got me thinking about the function of dolls and why they hold such fascination for many of us. The doll was affectionately named "Katya" by the current owner's grandmother. Her grandmother lived near the cultural center of Lviv in western Ukraine and was given Katya in the 1890s. Katya's cloth body joins together her head, hands and high-heeled feet of composition, a material made mostly from the mixture of sawdust, glue and wood flour. She is still wearing her original hand-embroidered traditional costume and is adorned with a beaded floral and velvet headdress with embroidered silk ribbons flowing down her back.
Repair and restoration of an antique historic doll, art conservation of clothing and doll. Ukranian doll, heirloom collection
Up-close of "Katya" before treatment.  The owner wanted the make-up substantially toned-down to be closer to the original that she remembered as a chi

However, according to her owner, the bold make-up she wore was not original, as she informed us the doll was restored in NYC in the 1960s. This was evident by the way the dark brown eyeshadow was inexpertly applied. Otherwise, she was in remarkable condition for an antique over 120 years old and only came to the studio to repair the garishly applied make-up as well as her detached foot.
ukranian doll in traditional dress, repair and restoration of dolls and clothes, art conservator in private practice, expert care.
Katya, after treatment.
repair and restoration of antique dolls, archival materials, professional art conservator, dolls and doll clothes, Ukranian doll
Close-up of Katya, after treatment.

Children have played with dolls and doll-like toys for millennium. The first were simple, vague figures made of clay, wood, stone, bone, cloth and other natural materials, presumably for ritualistic purposes. In contrast today, dolls are made out of modern plastics and porcelain composites and are barely more than commercial novelty products of a materialistic world. 

Unlike our conception of dolls today, especially the "baby doll", the oldest dolls were "lady" dolls representing well-dressed women, such as Katya. Not unlike the notion of dolls today, "lady" dolls were not only play things but were also meant to prepare young girls for their later roles as wives and mothers. However, beginning in the early 20th century, doll-making strayed away from the conservative towards the risqué, with the growing popularity of the boudoir doll. Before the 1900's, dolls wore the latest costumes and followed the fashionable trends of European courts and represented the proper European woman. They were not toys, but instead were carried by fashionable women of the time. They were posed on sofas, chairs, beds and carried at balls, dances and other social events.

http://media-cache-ec0.pinimg.com/236x/d8/13/e1/d813e1adb36b0f8b34c9c0721b13c440.jpg
Antique Boudoir Doll, Wax Over Composition
Lady Doll, Circa 1860's
Yet the traditional style did continue into the early 20th century. Consider the boudoir doll we treated in 2011. This example of a lady doll, also dating to the early 1900's, shows a figure in a conservative silk gown, but her hair and make-up are distinctly modern with dark red lips and bright blue eyeshadow. Though from an later era than Katya, this doll was in worse shape when she came to us. Her composite face was flaking away and several holes were present in her silk garment. We consolidated and inpainted her face, filled in where her hair had thinned and mended the tears.

boudoir doll repair restoration, professional art conservation by conservator Gwen Spicer
Boudoir Doll, Composite, silk and cotton,
early 20th C
Even though this conservative style survived into the new century, the modern woman, as well as her boudoir doll, was rapidly changing. The new contemporary aesthetic of shortening hairstyles and skirts, the freeing of the body from the constricting corset, as well as striking cosmetics, gave rise to the flapper and smoking dolls of the era. Their popularity grew as symbols of the provocative life of the 1920's when Prohibition was in full swing.

Flapper with her boudoir doll, circa 1920s
However while dolls in America were following the styles of the modern age, European dolls somewhat maintained their traditional roots. Like Katya, with her conservative dress and her bold make-up, the European doll did not reflect the temptations of modern society as daringly as their New World counterparts. Europe did not experience Prohibition, nor the economic boom that led to the excesses of the "Roaring Twenties." Europe was recovering after the Great War and the aesthetic followed the lines of art deco, which shared similarities to American 20s style. But Europe's dolls, in a limited sense, with their bold make-up, coquettish eyes and a provocative expression, also tested the boundaries of the ideal image of a proper lady. Despite their differences, modern boudoir dolls across the globe allowed even the everyday girl to vicariously live the lifestyle of a free modern woman.

Antique French Boudoir Doll, Composition,
silk, cloth, circa 1920s
_____________________________
Gwen Spicer is a textile conservator in private practice.  Spicer Art Conservation specializes in textile conservation, object conservation, and the conservation of works on paper.  Gwen's innovative treatment and mounting of flags and textiles is unrivaled.   To contact her, please visit her website.

Wednesday, September 11, 2013

September 11th and a flag that survived.

Image from The NY Times
by Barbara Owens, SAC Staff

What you may not know is that the New York State Museum in Albany is the largest repository of artifacts from the September 11, 2001 attack on the World Trade Center buildings in New York City. If you do know about it, and you've had a chance to visit, you have seen a poignant exhibit that covers the event, the response, and the recovery in a way which comprehensively tells the story of not just a single date, but the time that followed when artifacts were uncovered from a massive debris field. The exhibit tells the story of an event that none of us will ever forget.

Trade Center towers.  Image from Google images.

One object found in the debris was a United States flag.  While not the only flag found, this flag was one which flew from a world trade center tower, although which tower is unknown.


Finding a flag in the debris is truly amazing. Picture an unending amount of twisted metal, dust, dirt, and unknowable objects. Now imagine coming across a flag like this (see image below), virtually intact and minimally soiled.  It must have been an incredible find for recovery workers.


display of september 11th flag at NYS museum, art conservation of flag, historic flag
An overall view of the flag after it arrived at SAC.

The flag measured 7' 6" high and 11'6" in length. It had many scattered tears, the largest was 16"x5" located at the top white stripe. It had 40 mid-sized tears, and approximately 30 small tears. See the images below.

tear in flag from the world trade center, art conservator, museum display, September 11
The largest of the tears


holes in canton, historic flag, art conservator, stabilization of september 11th flag for display at NYS Museum
Holes in the canton


smaller tears


Unlike many flags that come through our doors, keeping the damage to this flag prominent and unaltered was the priority, yet equally important was making the intactness of the flag evident. How could a flag endure an explosion and a building falling on top of it? Imagine a thin nylon flag buried under tons of rubble, coming out of the dirt and debris with bright colors of red, white and blue, the flag damaged, but intact. The symbolism was not lost on rescue workers, and the effect was not to be lost on exhibit goers. Head Conservator, Gwen Spicer, knew this was an important juxtaposition. Her task was to conserve the flag, yet allow it to show all of its tattering along with its majestic color. The flag would be hung prominently at the center of NYS Museum's exhibit, so it would require a hanging system to allow it to flow freely, yet not create stress on the holes and tears it suffered that fateful day.
flag conservator, textile conservation, september 11th flag display.

The flag as it is seen in the exhibit at the NYS Museum.  Image from the Museum's web site.
You can see this image in a panoramic display of the permanent 9/11 exhibit here:
http://www.nysm.nysed.gov/exhibits/longterm/wtc/panorama/wtc3_flash.html

Twelve years has passed since that day in September, yet the objects and the memories of that day live on at the NYS Museum in their permanent collection and ongoing exhibit, visit it if you can.
If you are unable to visit this exhibit, the museum has made much of this information available on its website: http://www.nysm.nysed.gov/wtc/. Included are panoramic views of the exhibit space.

_____________________________
Gwen Spicer is a textile conservator in private practice.  Spicer Art Conservation specializes in textile conservation, object conservation, and the conservation of works on paper.  Gwen's innovative treatment and mounting of flags and textiles is unrivaled.   To contact her, please visit her website.


Wednesday, August 21, 2013

When good intentions go bad

by Barbara Owens

What were they thinking?  Not often, but more than we would like, we receive an artifact that has previously been "helped" by someone along the way. Sometimes the helping is in the form of well intentioned duck-taping to prevent a tear from further opening, sometimes it is another tape: masking or scotch, used to secure an embroidery or print to a frame or board many years ago. Or perhaps a textile has been washed and scrubbed. And other times, vacuumed (think shop-vac type). Antique flags are stitched together or cut and patched. More permanent intentions are the items that have been glued, or rubber cemented, to wooden boards or poster boards. These are the ones that make a certain conservator I know say, "oh, dear" while she shakes her head, undoubtedly feeling sorry for the poor textile or object.
old repairs, art conservator, former repairs to artifacts and antiques
Yard stick used to support an old frame.

As the photo above illustrates, one of the interesting things about some of these creative treatments of antique, cherished, or rare items is that they are often telling of the time period they received this creative treatment. So often with framed pieces, an old newspaper is sandwiched between the object and the backing board of the frame. And sometimes flags and other textiles have also come wrapped in old newspaper, or placed in a box with the newspaper to cushion it. In the photo above a yard stick was used as a support for this old frame. These items are a great glimpse into when the object was put away as an object to be treasured.

duct tape repair to textiles, art conservator,
The numerous holes in this hooked rug are held together with duct tape on both the front, as well as the back.

Of course we know each of these "helps" were applied with the intention of doing good. And luckily none of the applications of glue, tape, or creative stitching has been impossible to undo. Tenacious in its resistance and sometimes close to almost impossible, yes, but never impossible to remove, reduce or lessen!

old repairs to paper, tape, art conservator needed
This is the reverse side of a pastel landscape that had suffered a puncture and tears many years previously. The front actually didn't look as bad as the backing, shown above. The puncture is located under the masking and scotch tapes.  The tear lies beneath the scotch tape "x"'s. The pastel was also glued and taped to the board.  
art conservator treatment and repair, tape damage on paper
The back of the pastel after treatment.  The tape has been removed and the damage repaired.

I also imagine this scenario: it is sometime in the past... 25, 50, maybe even 75 years ago, and I am in possession of a rare and wonderful family treasure. Would I even have a clue that there were people working as art conservators who could help? It may not even cross my mind. But what is on my mind is: "what shall I do to keep Great Aunt Millie's girlhood sampler from falling apart?" Or the crumbling photograph of great-grandpa as a boy (see below)?


damage to old photograph, antique photograph tear, art conservator needed.
This photograph is being held together, and attached to cardboard, by various types of tape.  

In this scenario, drastic steps like glue might seem like an obvious choice. Who would have known the glue would change so much over the years, or that it would harm the fibers or paper? I imagine when they had completed their "treatment", the person doing the helping felt very proud of what they had done, and at that moment, the improvement was substantially better.

old repairs to paper, art conservator needed, before treatment photo of antique map, historic document repair
This map from 1807 was not only laminated, but also "framed" with combination of black "fabric" tape and an outer edge of green duct tape.  The plastic coating began to separate from the map due to water damage.
old repairs to historic documents, art conservation, maps, artifacts,
The well-worn, 206 year-old map that was hidden beneath the plastic and tape.
Some of my favorite stories come from individuals who have called the studio to "report" what they have done, and then look for advice on how to proceed. One such call came in recently, where a kind gentleman from Georgia had a 18' x 10', 48-star flag in his barn (history lesson: in 1912 the flag went from 46 to 48 stars with the addition of Arizona and New Mexico. It stayed at 48-stars until 1959 when Alaska made it 49). The gentleman said the flag had belonged to his grandfather and had been in the barn for at least 50 years, folded inside a garbage bag. When he took it out, it smelled really bad and so he laid it out on his gravel driveway and sprayed it down with the hose. Oh, dear.

So when I think about all the "oh dear's" we have seen, and how many more we will treat in the future, The answer to "What were they thinking" is quite clear:  They were doing the best they could with what they had, and above all, they were trying to "help" the piece.
_____________________________
Gwen Spicer is a textile conservator in private practice.  Spicer Art Conservation specializes in textile conservation, object conservation, and the conservation of works on paper.  Gwen's innovative treatment and mounting of flags and textiles is unrivaled.   To contact her, please visit her website.

Wednesday, August 14, 2013

Magnets, an alternative to Velcro?

by Gwen Spicer

Large textiles have been hung using Velcro since the 1970’s, with little change of technique. The first instructional handouts produced in the late 1970's, were from the Textile Museum and the Smithsonian Institution. The looped side of the Velcro is machine stitched to fabric, typically wide twill tape and then hand-stitched to the reverse side of the upper edge of a textile; while the hooked side is attached to the wall. However, over the years disadvantages of Velcro have come to light, like discoloration of the Velcro. In addition the loop-side of the Velcro that is sewn to the webbing and then hand stitched is quite bulky and poses difficulty with storage, whether rolled or boxed. In addition, stitching was not always a solution for all textiles.


Could magnets be an alternative, or even a substitute?  Several methods of using magnets as an alternative have been developed by conservators recently.

The philosophy and design to an alternative to Velcro when hanging large textiles remains the same.  A rule of thumb for Velcro is that it can support about 100 lbs per square inch (But this rule does not apply if the velcro has aged and the tiny hooks have deteriorated!).  Finding a magnetic system that equals this is less straightforward.  As stated in earlier posts, when using and selecting magnets of any type there are three key components that are in play. (see previous posts about magnets "Ferrous Attraction the Science Behind the Magic", et al, by clicking this link).  


1. The actual strength of the magnet itself.
2. The ability of the metal behind it to be magnetized.
3. The space between, or the gap created by the layers between the magnet and its receiving side.

how to test your magnetic hanging system, Gwen Spicer, textile conservator, AIC fellow, using magnets instead of velcro to display or hang artifacts textiles flags and banners
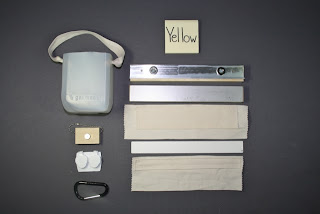
Magnet components provided in the AIC Hands-on Session.


The challenge is that unlike paper, textiles can be quite heavy, creating a concern with downward pull of the artifact, or sheer stress of the system that results in failure or compression of the artifact at the magnet site. One of the groups in the hands-on session at AIC 2013 tested out a solution developed by SmallCorp Inc.

This solution that solves the weight uses an aluminum strip with a small lower lip (L-shaped in cross-section). Disc magnets, Grade N42, measuring ½” / ¾” dia. X 1/8”, with counter sunk holes are fastened along at 4” intervals on the vertical side. A 22-gauge steel piece is held into a stitched sleeve along the upper edge of the artifact. In this solution the lower lip actually holds the weight of the artifact, but it is the magnets that ensure that the steel piece is held back and onto the aluminum horizontal element. See the diagram below. 
alternative to velcro display for museums. Magnetic mounting and display of textiles and artifacts, collection care.
¾” disc N42 Neodynimium magnets with counter-sink hole are screwed to a 
“L”-shaped aluminum bar. The magnets are spaced about 4” apart. The lower 
lip holds the 22-gauge steel that is secured in the sleeve and attached 
to the textile. The magnets keep the steel sheet back against the support.

The solution appears to be able to support substantial weight due to the lower lip. The secured magnets can be adjusted closer or further away from the vertical side, making the lip’s depth smaller if the protrusion is too large for any specific situation.


closeup of magnetic mounting slat bracket for rare earth magnet mounting system to safely display and mount textiles and artifacts for exhibit. Gwen Spicer is a conservator in private practice who is an expert in the use of magnets for mounting artifacts and in conservation treatments.


Another view of the L bracket for hanging textiles and artifacts using rare earth magnets as an alternative to velcro. Gwen Spicer is a conservator in private practice who is an expert in the use of magnets in conservation.
Two up close images of the "L" bracket

SmallCorp Inc. provides the metal components in the length that one desires (The "L"-shaped aluminum with the attached magnets and the powder-coated steel strip). The conservator or preparator creates the webbing sleeve for the powder-coated steel, just like one would for a Velcro system. Sewing the opening for the steel does need to be done with some precision in order to have a good fit. Then the webbing is stitched to the reverse side of the artifact. And you are ready to go!


magntic mounting slat developed and used by Spicer Art Conservation for teh non-invasive mounting of historic textiles and artifacts
The cotton webbing sleeve with the powder-coated steel
plate, secured to the aluminum "L"-shaped mounting bar.


_____________________________
Gwen Spicer is a textile conservator in private practice.  Spicer Art Conservation specializes in textile conservation, object conservation, and the conservation of works on paper.  Gwen's innovative treatment and mounting of flags and textiles is unrivaled.   To contact her, please visit her website.

Learn more about magnets and their many uses in the new publications Magnetic Mounting Systems for Museums and Cultural Institutions. Available for purchase at www.spicerart.com/magnetbook.


Tuesday, July 23, 2013

How do you know? Dating a War of 1812 sash.

by Nicolette Cook, SAC Conservation Team

A red silk sash, presumably from the War of 1812, recently came through the studio to be treated for an upcoming museum exhibit. While working with this amazing artifact my interest was peaked. I have seen several sashes from the Civil War, but few that have survived from this early conflict. A good question to ask is: how can you tell that this particular sash is from the War of 1812? To recap history in the simplest of terms, the United States declared war on Great Britain over numerous violations involving trade with France, their impressment of American merchant sailors, as well as providing military support to the Native Americans fighting against American expansionism. When the war broke out, both sides received support from regimental and militia units formed in Canada. This is significant because the sashes extent from this period were worn by officers who participated in the Great Lakes and Western Territories campaign and are held by institutions around the Ontario, Canada and Niagara Falls/Buffalo, NY areas, including the Niagara Falls Historical Society and Museum and the Buffalo History Museum (BHM).

War of 1812 sash, dating of an artifact, collection care, Buffalo History Museum, art conservator, textile conservation
Silk sash worn by Lt. Col. Seymour Boughton during
the War of 1812, Buffalo History Museum.

According to BHM, the sash was worn by Lieutenant-Colonel Seymour Boughton. Fighting against the British, he commanded 129 men of the 12th Regiment Cavalry, 1st Brigade for Ontario County during the War of 1812.  Lt Col Boughton was from the town of Avon in Ontario County and he died December 30th, 1813 in the Battle of Buffalo, also known as the Battle of Black Rock.

This particular sash, though not ornate, does feature a very interesting weave structure known as "sprang."

Sprang weave detail from War of 1812 sash, Art conservator, historic textiles, museum collection, Buffalo History Museum
Detail of sprang weave from Boughton's sash.

This technique features warp strands (the longitudinal threads of a textile) fixed at both ends on a loom, which are then twisted or interlaced together. The weave is begun at one end of the warp, while the same pattern is produced simultaneously at the opposite end. The weave is then tightened and held in place with sticks or rods. In this way the work progresses until the weave meets itself in the middle of the resulting fabric. Another aspect of sprang is either a small number, or the complete absence, of weft strands (the transverse threads of a textile). Unlike most woven textiles, an artifact with this sprang weave structure is very elastic in nature allowing the fabric to stretch around unusual shapes such as hair buns, knees and elbows. Interestingly, the oldest extant example of sprang weaving can be dated back to 1400 BC with a hairnet from Borum Eshøj, Denmark. Other early examples are also found in South America dating to 900 AD.

Bronze Age hairnet done in sprang technique from Borum
Eshøj, Denmark, c.1400BC, National Museum, Copenhagen

To get back to the original question, what is the evidence that this sash is from the War of 1812 and not from the Civil War for example? It is not unusual to use the same style of garment for a number of years, thus it makes dating such items to a specifically narrow time period very difficult. Without the crucial information about the officer who originally wore the garment, there is not much to help determine the exact era of origin. Really the only way to know with any certainty is to compare this sash with others known to be from the same time period. First, in order to rule out that we do not have a Civil War sash, we have to examine the evidence. Luckily we have a significant amount of photographic documentation of Civil War military dress. It was in 1839 when Louis Jaques Mandé Daguerre refined his photographic process and developed the first daguerreotype. It involved exposing a copper plate coated with a thin layer of light sensitive silver. After exposure for several minutes the image was fixed in a sodium solution bath. The process came to America soon after it’s invention and a vast number of images were created chronicling everyday people as well as soldiers who participated in the Civil War. Below, one such image of Captain James Thomas Bussy shows the style of sash he wore as part of his Civil War uniform.

Daguerrotype of Captain James Thomas Bussey, who led Co. H. 2nd Maryland Infantry,
wearing a waist sash.  Dave Mark Collection.

From what I've seen of Civil War era sashes in text, photos and from previous projects I've worked on, there is one distinct difference apparent right away - the tassel. Of the few examples that I've seen of War of 1812 sashes, the warp threads are woven closely together to tie off the sprang weave structure, then are twisted together to form the fringe. Consequently the body of the garment and the fringe are one continuous piece. Unlike Lt. Col. Boughton's sash, the warp threads of Civil War era sashes do not form the tassel.  Here the structure of the tassel consists of an acorn mould, a collar, and a fringe skirt. Capt. Bussey’s tassel, compared to Lt. Col. Boughton’s, exhibits a more complicated structure that is common to all Civil War sashes. This can be seen in several surviving images that are too numerous to reproduce here. Seen in the example below, the Civil War tassel is separate structure to which the sash is attached. If that is not convincing, take a look at the fading present on the Major Teed's sash compared to that of the unknown officer, or Lt. Col. Boughton's above. As a sash is worn the tassel receives the most wear and the most exposure to light. The 1812 tassels are not faded while that of the Civil War is significantly so.

Then we must look at the weave structure. As already stated, the sash I treated from BHM, similar to the sash from Niagara Falls History Museum, features a sprang weave structure. While sashes from the Civil War era were constructed using a plain weave technique, which involves each warp or weft passing over one thread then under the next. This difference in weave structure is common, and thus indicative that in fact the BHM sash can be dated to military dress during the War of 1812.

Detail of tassel and weave structure from a War of 1812 sash, officer unknown, Niagara Falls History Museum

Detail of tassel and weave structure of a sash worn by Major William Teed,
8th Missouri Cavalry, Wilson's Creek National Battlefield; WICR 30230  
The evidence is few due to the simplicity of the garments, but drastic enough to be convincing.  The difference in weave structure and tassel construction are important pieces of information that distinguish the sashes and indicate that they were worn during different conflicts. I believe that the documentation present in the daguerreotypes taken during the Civil War is probably the best evidence we have to prove that the sash from BHM and others like it are from the War of 1812. The BHM artifact does not resemble these documented sashes in the slightest, and thus cannot be mistaken for a Civil War item. Take these images into consideration, along with the physical characteristics and corresponding information/ evidence of who wore the particular garments, and no doubt is left in my mind that we can confidently date Lt. Col. Boughton’s sash to the War of 1812.
_____________________________
Gwen Spicer is a textile conservator in private practice.  Spicer Art Conservation specializes in textile conservation, object conservation, and the conservation of works on paper.  Gwen's innovative treatment and mounting of flags and textiles is unrivaled.   To contact her, please visit her website.

Tuesday, July 16, 2013

The "After" Life of an Enormously Large Basket and its Lid

Our story begins with this large box, a box that clearly has seen better days. It was covered with old, peeling, tape and rested on a wooden pallet in the middle of a climatized warehouse. What was inside? That was the question, and to make it all the more mysterious, when the box was mentioned, it was always spoken about in a hush voice, as if we were afraid the box would know we were asking about it.

This box of mystery is owned by the Department of Interior, and it was part of a larger project to rehouse over 800 baskets in the collection. When we saw this box, we had no idea what was inside, and little did we know what we would find.

The very large cardboard box.

When the lid was finally pried off and the tape released, all that could be seen was the lid to a preposterously large basket. The lid seemed lost as clearly there was damage. A rim somewhere was broken, and was now just resting on the lid. The basket below was wrapped and appeared protected. Perhaps too protected, as no one had any idea what it was and it had never been unwrapped during a time when any present DOI staff member could remember!


Finally, it was time to see what we had. The box was carefully brought into the workspace and the outer cardboard walls and layers of wrapping materials were removed. The lid of the basket was lifted, to find that the entire basket was full of polyester batting!  


Tohono basket in the conservation lab for rehousing and support by art conservators. Shaun Pekar assists.conservation studio, lab, Native American basket, Tohono basket, museum collection care

What we found was a wonderfully preserved coil construction basket with slightly tapering sides, covered with images of several birds within a diamond lattice design. The birds were depicted as flying or swimming, and some with wings raised. The records showed that it was believed to be a Tohono O'odham basket, possibly made with yucca, Devil's claw and cattails. If you are not familiar with the Tohono O'odham, they are a people of the desert southwest, living in an area at the southern border of Arizona.  Tohono O'odham means "desert people" in their language, and they are well-known for their contemporary coiled basketry.

Tohono O'ogham basket, art conservation, archival support, museum collection care
One of the many birds.

The materials used to construct the basket were in good shape, however, it is the shape and overall weight of the basket was not helping it. The lower third of the basket was buckling under its own weight, and in a matter of time, tears and weak areas were going to develop. Certainly from the photos you can see this basket is incredibly large, to be specific it was 91" tall and 84" around at its largest point.

Tohono basket repair, Native American basket, art conservation, laboratory, historic, archival storage

Like all the other baskets treated in this collection, it (and its lid) was vacuumed, both inside and out. And then we had to address the most pressing issue, how to support the weakening base? It was, after all, the inherant-vice of the weight of the basket that was causing the bulges to appear. The flaring shape just was not conducive of its size and weight.


Lid of Tohono basket, art conservation of Native American artifacts, laboratory
The loose band of coiling was found to be part of the lid's
 internal rim. It was determined to keep the rim with the lid
but not reattacted.

Supporting the lower sides, both inside and outside, was the decision made and was no easy feat when tackling such a large artifact. What was decided was to produce a "girdle" of sorts. The girdle would wrap around the outer surface, while internal braces were positioned inside. Below are images of the various steps.

Art conservators working on historic Native American Basket, collection care, archival support
Blue board was scored at even intervals. Here Shaun and
Toosie are positioning the boards.
The measured boards were secured and lined
with Ethafoam sheeting.
Shaun and Ron Harvey doing final adjustments.
The ends were trimmed diagonally for a snug fit.
internal braces created by art conservators caring for the basket collection of historic Native American pieces. Tohono basket
Internal supports that braced the interior sides.
Large Tohono basket in Native American collection of the US Department of the Interior, custom made support and storage created by Art Conservators
Shaun adjusting the securing outer straps.
Native American basket, Tohono, museum collection care, art conservation, after treatment image
The rehoused, and now fully supported basket!


The basket along with the batting that was inside.

The basket is still a mystery in that we are not sure what it was specifically made for, when exactly it was made, or even if it was made by a Tohono O'odham member. The Tohono O'odham are possibly the largest seller of Native baskets, so they not only produced the baskets for traditional utilitarian purposes, they also made them for ritual uses and to sell to tourists. A basket of this size is not typical, so I wonder was it made for collecting a lot of beans? Or perhaps a huge laundry hamper for a family with a bunch of kids? Or perhaps it is so unique because it was made for a ritual or particular occasion, if so, what was its purpose?
_____________________________
Gwen Spicer is a textile conservator in private practice.  Spicer Art Conservation specializes in textile conservation, object conservation, and the conservation of works on paper.  Gwen's innovative treatment and mounting of flags and textiles is unrivaled.   To contact her, please visit her website.